Creating a database in cPanel is a crucial task for setting up applications like WordPress, Joomla, and other web-based software that require a database to store data. Here’s a detailed guide on how to create a database in cPanel for Host4Geeks users:
Step-by-Step Guide to Creating a Database in cPanel
1. Log into cPanel
- Access cPanel
Open your web browser and enter the cPanel login URL provided by Host4Geeks. This is typically something like https://yourdomain.com/cpanel or https://yourdomain.com:2083.
- Login Credentials
Enter your cPanel username and password to log in.
2. Navigate to the Databases Section
- Dashboard View
Once you are logged into cPanel, you will see the main dashboard with various sections and icons.
- Search Bar
You can use the search bar at the top to quickly find settings and tools. Type “databases” into the search bar.
- Databases Section
Alternatively, scroll down to the “Databases” section in the main dashboard. This is where you will typically find database management tools.
3. Access the MySQL® Databases Tool
- MySQL® Databases Icon
Look for the “MySQL® Databases” icon within the Databases section. The icon is usually labeled clearly.
- Click on the Icon
Click on the MySQL® Databases icon to access the database management interface.
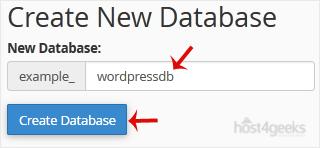
4. Create a New Database
- New Database Field
In the MySQL® Databases page, locate the section labeled “Create New Database”.
- Enter Database Name
In the text field provided, enter a name for your new database. cPanel may automatically prepend your cPanel username to the database name to ensure uniqueness (e.g., username_databasename).
- Create Database
Click the “Create Database” button. You should see a confirmation message indicating that the new database has been created successfully.
5. Create a Database User
- New User Section
Scroll down to the “MySQL Users” section where you can add new users.
- Enter Username
In the “Username” field, enter a username for the new database user. Similar to the database name, cPanel may prepend your cPanel username to ensure uniqueness (e.g., username_dbuser).
![]()
- Enter Password
Enter a strong password for the new user in the “Password” and “Password (Again)” fields. You can use the “Password Generator” button to create a strong password.
- Create User
Click the “Create User” button. You should see a confirmation message indicating that the new user has been created successfully.
6. Assign the User to the Database
- Add User to Database Section
Locate the section labeled “Add User to Database”.
- Select User and Database
Use the dropdown menus to select the user and the database you just created.
- Add
- Click the “Add” button to assign the user to the database.
7. Set Database User Privileges
After adding the user to the database, you will be prompted to set the user’s privileges.
- Select Privileges
You can select individual privileges or check the “ALL PRIVILEGES” box to grant the user all available permissions.
- Make Changes
Click the “Make Changes” button to save the user privileges. You should see a confirmation message indicating that the user’s privileges have been updated successfully.
Additional Tips for Managing Databases
- Secure Passwords
Always use strong, unique passwords for database users to enhance security.
Regularly back up your databases to prevent data loss. You can use the “Backup” feature in cPanel to create backups of your databases.
Use phpMyAdmin, accessible from cPanel, to manage your databases, run queries, and perform advanced database operations.
Troubleshooting
- Connection Issues: If you experience issues connecting to the database from your application, ensure the database name, username, and password are entered correctly in your application’s configuration file.
- Insufficient Privileges: If you encounter permission errors, double-check the user privileges to ensure they have the necessary permissions to perform required actions on the database.
- Database Limits: If you cannot create new databases, you might have reached the limit of databases allowed by your hosting plan. Check your plan details or contact Host4Geeks support for assistance.
Contacting Support
For any issues or additional help, you can reach out to Host4Geeks customer support through:
- Support Portal: Access the support portal from your Host4Geeks account.
- Live Chat: Use the live chat feature on the Host4Geeks website.
- Email: Send an email to the Host4Geeks support team.
By following these detailed steps, you can easily create and manage databases in cPanel on Host4Geeks, ensuring your applications have the necessary database resources to operate effectively.