When you’re managing a WordPress website, it’s easy to run into memory issues, especially if your site is growing, using more plugins, or just trying to handle more traffic. You may have seen errors like “Allowed memory size exhausted,” which can be frustrating and leave you feeling stuck.
Fortunately, increasing the memory limit in WordPress is possible and an easy process that can significantly improve your site’s performance.
In this guide, we’ll walk you through everything you need to know to increase the memory limit in WordPress, along with some handy tips to optimize your site along the way. So, without any further ado, let’s get started!
Why WordPress Memory Limits Matter
WordPress memory limits are like the gas tank in a car: they determine how far (or in this case, how many tasks) your site can go before running out of resources. When you’re using WordPress, the default memory limit is typically set around 32MB to 64MB, which is fine for small, straightforward sites.
But if you’re running an e-commerce store, a membership site, or a content-rich blog with a lot of plugins, you’re likely going to need more memory to avoid errors and keep things running smoothly.
Signs Your WordPress Site Needs More Memory
Knowing when to increase the memory limit in WordPress isn’t always obvious. Here are some common issues that indicate you may need more memory:
- You see the “Allowed memory size exhausted” error – This is the most direct sign that your site is running low on memory.
- Slow or laggy performance – If pages are taking forever to load, especially on a high-traffic site, it’s a signal that more memory could help.
- Problems with plugins and themes – Sometimes, trying to activate or update a plugin or theme can cause memory errors.
- Difficulty uploading images or media files – Limited memory can cause issues with uploading and displaying media files on your site.
These are a few examples, but any time you notice performance issues, it’s worth checking whether your memory allocation is to blame.
How to Check Your Current Memory Limit
Method 1: WordPress Dashboard
To check your memory limit directly in WordPress, go to Tools > Site Health. Here, you’ll find information on your site’s current memory allocation. This tool is helpful, especially if you’re running a more recent version of WordPress.
Method 2: Plugin Solutions
You can also use plugins like Query Monitor or WP Server Stats to check your memory limit. These plugins can also give you insights into how much memory your site is using, which can be very helpful when troubleshooting.
Method 3: Look in the wp-config.php File
The wp-config.php file is the backbone of your WordPress site. It stores essential configurations, including the memory limit. Here’s how you can check it:
- Log into your cPanel or access your site’s files through an FTP client like FileZilla.
- Find the wp-config.php file in your root directory.
- Open the file and look for this line: define(‘WP_MEMORY_LIMIT’, ’64M’);
This line shows the current memory limit. If you don’t see it, it means WordPress is using the default limit set by your hosting provider.
Step-by-Step: How to Increase the WordPress Memory Limit
Method 1: Increase the MemoryLimit via wp-config.php
Here’s one of the most common ways to increase the memory limit. You’ll need access to your site’s files, either through your hosting provider’s control panel or an FTP client.
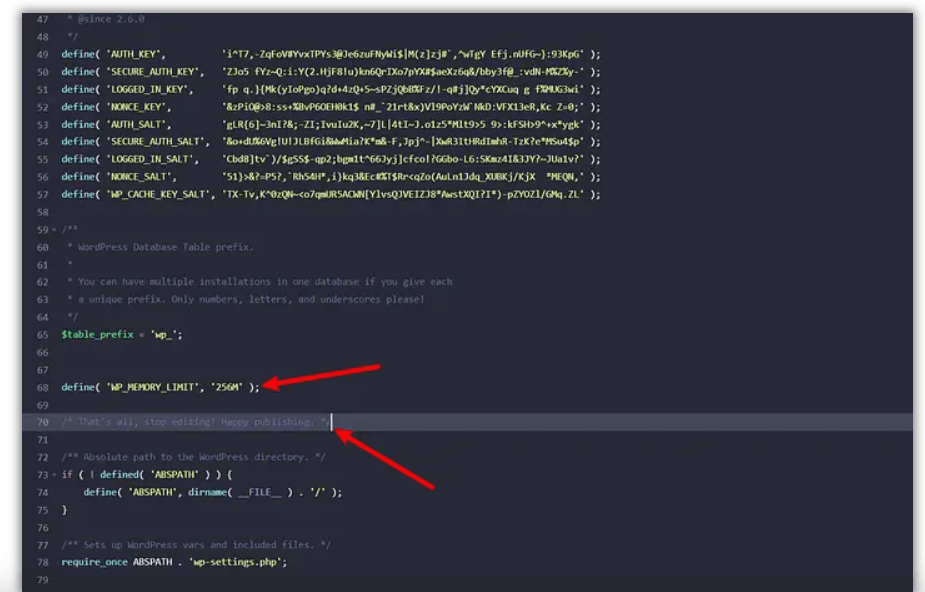
- Open the wp-config.php file, located in your site’s root directory.

- Look for the line that says define(‘WP_MEMORY_LIMIT’, ’64M’);. If it’s not there, you can add it.
- Change the number to whatever you need, like 256M or 512M for larger sites.

- Save the file, then reload your website to see if the change worked.
Increasing your memory to 128MB or 256MB is usually more than enough for most WordPress sites. However, if you’re running an intensive site with plugins like WooCommerce or Elementor, you might need more.
Method 2: Use the PHP.ini File
If you have access to the PHP.ini file (some hosts may restrict this), you can use it to increase the memory limits in wordpress.
- Access the PHP.ini file through cPanel or your server’s file manager.

- Find (or add) the line: memory_limit = 256M;.
- Save the file and refresh your site.

Keep in mind that on shared hosting, this file might not be accessible or editable. In that case, reach out to your hosting provider’s support team.
Method 3: Update the .htaccess File
The .htaccess file can also be used to boost and increase the memory limit in WordPress. This file is usually hidden, so make sure your file manager settings allow you to view hidden files.
- Open your .htaccess file in the root directory.
- Add this line: php_value memory_limit 256M.
- Save and close the file.
Note: Be cautious with the .htaccess file as it affects your site’s configuration. Make sure to back it up before making changes.
Method 4: Install a Plugin
If you’re not comfortable editing files directly, plugins like WP Config File Editor or WP Maximum Execution Time Exceeded can handle memory allocation for you.
- Benefits: Quick and straightforward, especially for beginners.
- Drawbacks: Sometimes plugins may not work if your hosting provider restricts memory adjustments.
Troubleshooting: If the Memory Limit Won’t Increase
There are a few reasons why your WordPress memory limit increase might not work. Here’s what to do if you encounter issues:
Hosting Provider Restrictions
Some shared hosting providers cap memory limits regardless of what you set in WordPress. In this case, contact your hosting provider and ask if they can increase the limit for you or consider upgrading your hosting plan.
File Permission Issues
When editing files like wp-config.php or .htaccess, permission errors can prevent changes from saving. Adjust file permissions using cPanel or your FTP client:
- Right-click on the file, select “File Permissions,” and ensure it’s set to 644.
Testing Changes
If a memory adjustment doesn’t seem to work, try clearing your site’s cache. If you’re using a caching plugin, clear the cache, and test your site again.
Using Backups for Safety
Before making changes, always back up your site. You can use plugins like UpdraftPlus to create a quick backup. This way, if something goes wrong, you can restore your site to its previous state.
Optimizing WordPress for Better Performance
Increasing the memory limit in WordPress is a good start, but there are a few additional tips that can help keep your WordPress site running smoothly:
- Use a Caching Plugin: Caching plugins like WP Super Cache and W3 Total Cache help reduce the load on your server, which indirectly helps with memory usage.
- Regularly Update Plugins and Themes: Outdated plugins and themes can hog memory. Keeping your site updated ensures better memory efficiency.
- Limit Plugin Usage: Not all plugins are created equal. Run regular audits and remove any plugins you’re not using. Look for lightweight alternatives if you have resource-heavy plugins.
- Optimize Images: Tools like Smush and EWWW Image Optimizer reduce image file sizes, which can lower the memory needed to load pages.
- Enable Lazy Loading for Images: Lazy loading delays image loading until they’re about to appear on the screen, which reduces initial memory usage and improves loading times.
- Use Content Delivery Networks (CDNs): CDNs like Cloudflare or StackPath deliver site content from servers closer to your visitors, reducing server load and memory usage on your WordPress site.
Considering Hosting Upgrades
If you find that your WordPress memory needs keep increasing or if you’re maxing out the resources available on your current plan, it may be time to upgrade your hosting:
Managed WordPress Hosting: Many providers offer managed hosting plans optimized for WordPress, often with higher memory limits.
VPS or Dedicated Hosting: For larger sites, upgrading to a VPS or dedicated hosting plan can provide more control over memory allocation.
Contacting Your Hosting Provider: Sometimes, a quick conversation with your hosting provider’s support team can yield memory increases, especially if you’re on a higher-tier plan.
Final Thoughts: Keep Your WordPress Site Running Smoothly
Increasing the memory limit in WordPress can solve a lot of performance issues and make your site more reliable. Whether you’re running a small blog or a large e-commerce store, managing memory limits is essential.
Following the steps above will ensure you’re maximizing your site’s potential, with minimal hassle. By staying on top of updates, optimizing plugins, and using caching solutions, you’ll create a smooth, fast experience for your visitors, which is great for SEO and user satisfaction alike. So go ahead, give your site the boost it needs, and enjoy a more responsive WordPress experience!

