Managing a server through Web Host Manager (WHM) can sometimes feel like running a tight ship. From adding new users to organizing resources, there’s a lot to keep track of.
Occasionally, you may find the need to clean house by removing cPanel accounts that are no longer necessary. Maybe a client no longer needs hosting, or you’re simply tidying up. Whatever the reason, knowing how to terminate a cPanel account properly is essential.
Now, when we say “terminate,” we mean a permanent removal of all associated data with that cPanel account—emails, databases, files, and everything else. So before jumping in, we’ll make sure you understand the significance of this action and cover all the steps involved to do it smoothly and safely.
The Importance of Terminating Accounts Correctly in WHM
1. Freeing Up Server Resources
When you delete an account, you’re not just removing a username; you’re reclaiming valuable server resources. Unused or abandoned accounts can weigh down your server, consuming disk space, memory, and bandwidth that could be better utilized elsewhere. It’s like decluttering a closet—you’ll be amazed at how much space you can free up.
2. Security Reasons
Old accounts can often become security risks, especially if they’re no longer maintained. Passwords might not be updated, outdated scripts might be left behind, or even worse, they might be compromised without your knowledge. Removing these accounts reduces the chances of vulnerabilities lingering on your server.
3. Staying Organized
If you’re managing multiple accounts, terminating unused ones helps keep your WHM dashboard tidy and organized. This way, you can focus on active accounts and efficiently monitor server activity without wading through old, inactive accounts.
Pre-Termination Checklist: Getting Ready to Delete a cPanel Account
Deleting an account is a permanent step, so let’s go through a few essential preparatory steps to make sure the process goes off without a hitch.
Step 1: Create a Backup
Even if the user doesn’t request it, it’s always wise to back up a cPanel account before deleting it. You might not think you’ll need it, but it’s always better to be safe than sorry. Think of this as making a copy of important documents before you shred the originals.
Creating the Backup in WHM: Navigate to Backup > Backup Restoration and select the account. Follow the prompts to download a complete backup of the account’s files, databases, and emails.
Step 2: Confirm You Have the Correct Account
In WHM, many accounts might look similar, especially if they’re listed under a client’s business with slight variations. Double-check the account’s domain name, username, and any other identifiers to ensure you’re about to delete the right one.
Cross-Reference with Other Data: Compare with client lists or billing records to verify you have the correct account selected.
Step 3: Notify the Account Owner (If Applicable)
It’s good etiquette—and often good business practice—to inform the account owner before proceeding, especially if they’re a paying client. You don’t want to catch them off guard, so a quick email explaining why their account is scheduled for deletion and giving them time to respond if they have concerns can save you a lot of headaches later.
Step-by-Step Guide to Terminating a cPanel Account in WHM
Now that we’ve done our prep work, it’s time to delete the account.
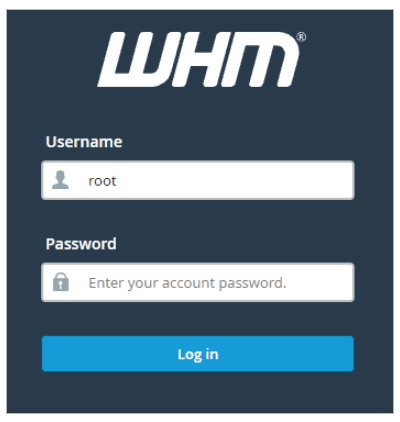
Step 1: Log into WHM
Open your WHM interface by going to your server’s WHM URL, usually something like https://yourserverip:2087. Use your root login credentials. If you’re not the root user, you’ll need appropriate permissions to delete accounts.
Step 2: Find the “Terminate Account” Option
Once inside WHM, look to the left-hand menu. You’ll see a wide variety of functions here. Scroll down to Account Functions—it’s the hub for managing user accounts, including deletion.
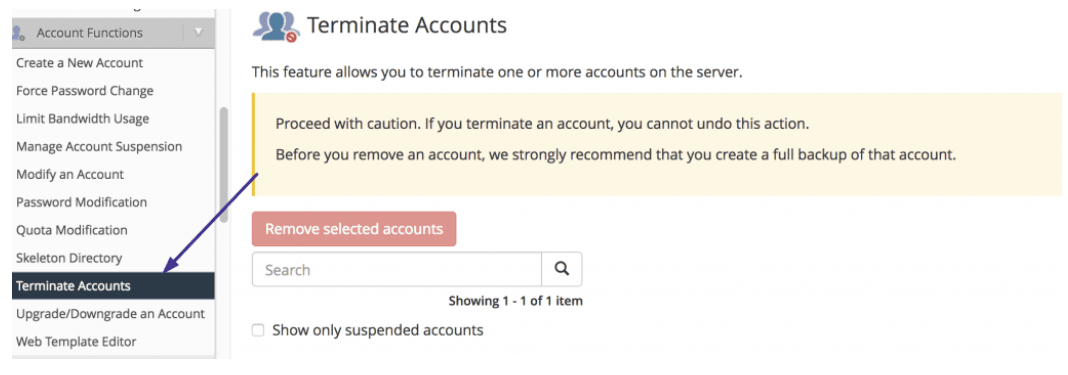
Tip: You can also use the search bar at the top to type in “Terminate an Account,” which is often faster.
Step 3: Select the Account to Terminate
When you click on Terminate an Account, you’ll be brought to a screen that lists all active cPanel accounts. They’ll typically be sorted by domain name, username, or IP address. Use the filtering options to quickly locate the account you need.
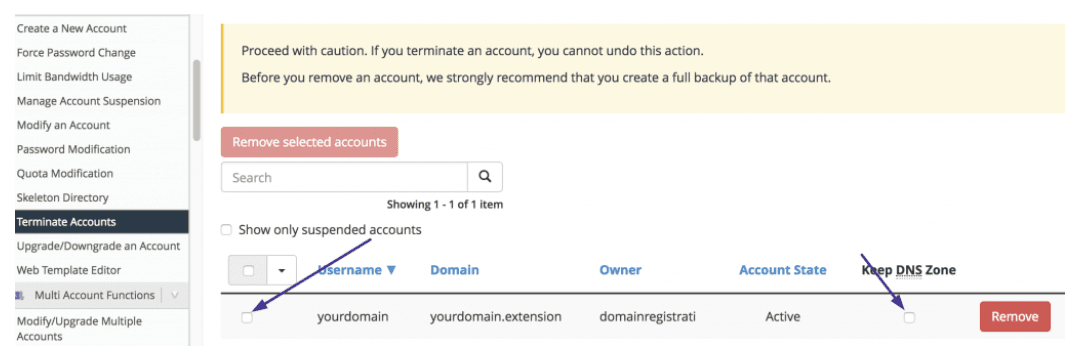
Cross-Check Details: You’ll see information like domain name, user, and owner for each account. Take a moment to confirm these details once again.
Step 4: Confirm Account Deletion
After selecting the account, hit the remove option to terminate the selected account.

WHM will display a warning screen. This is a final chance to ensure you’re deleting the right account. You’ll see a warning similar to: “Deleting this account will permanently remove all associated data and cannot be undone.” WHM isn’t trying to scare you; it just wants you to double-check everything.
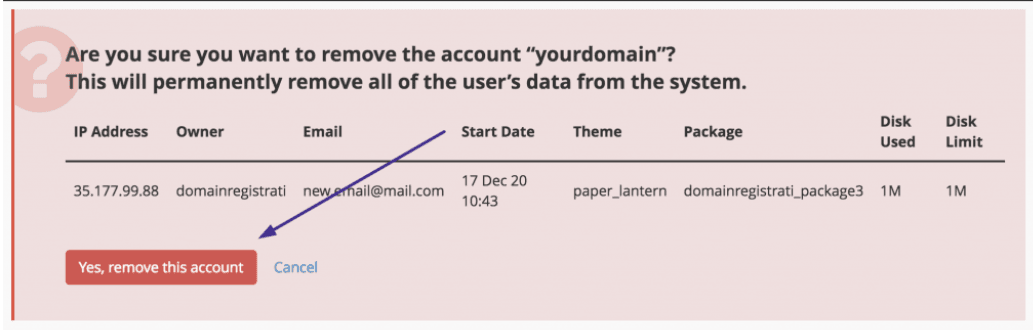
Click “Yes, Terminate the Account”: If you’re sure, proceed by clicking the button. WHM will now go through the process of permanently deleting the account. Depending on the size of the account and your server’s resources, this could take a few minutes.
What Happens After Termination?
1. Account Data is Permanently Deleted
This includes all emails, files, databases, and any website content. It’s a complete removal, similar to emptying the trash on your computer. If you’re feeling a twinge of worry about having deleted it, remember the backup you made earlier!
2. Server Resources are Freed Up
After deletion, WHM will automatically reclaim disk space, RAM, and any other resources the account was using. This may not be immediately obvious, but over time you’ll notice your server performs more efficiently as you keep unused accounts cleared out.
3. Account Removal Logs
WHM keeps a log of actions taken on accounts, including deletions. You can review this in the cPanel Log section if you need to verify that the account was terminated successfully or want to double-check any details. This is helpful for record-keeping, especially if the deletion is questioned later.
Troubleshooting Common Termination Issues
Sometimes, the process doesn’t go as planned. Here are a few issues you might encounter and how to handle them:
Issue: WHM Says “Termination Failed Due to …”
This error often pops up if the account is still using certain processes. Check for any active cron jobs, running scripts, or open connections tied to the account, and close them before retrying.
Issue: Disk Quota Not Reclaimed After Deletion
Occasionally, you’ll notice that the disk space isn’t immediately freed up. This can be due to cached data or temp files lingering in the system. Running a server clean-up or rebooting can help in these cases.
Issue: Client Requests Account Restoration
If a client realizes they need their account back after it’s deleted, restoration can be challenging. If you created a backup earlier, you can restore the backup through WHM’s restore function. If not, you’ll need to recreate the account from scratch.
Final Thoughts
Terminating a cPanel account within WHM may seem like a small task, but it’s essential for effective server management. By following these steps carefully and understanding the process, you can free up server resources, reduce security risks, and keep your WHM environment clean and efficient.
Remember, though, that deletion is final. Always back up before you delete, and double-check everything along the way! With a bit of practice, you’ll handle account terminations with confidence, keeping your server environment lean, secure, and organized.
As you continue to manage your WHM dashboard, you’ll find that routine cleanups and proactive account management keep your server running smoothly, ready to support the needs of your active users and any new accounts that come your way. Happy hosting, and here’s to a more efficient and secure WHM experience!