The Domain Name System (DNS) is the internet’s phone book. It turns the domain names internet users enter into browser search bars into Internet Protocol (IP) addresses, which browsers use to find internet pages. DNS Servers make it possible for internet users to input words, such as host4geeks.com, without having to know the website’s IP address.
The DNS Server is a program or device with a database carrying the IP addresses of the websites it serves to other devices. Android devices running on Android version 9 and above have a private DNS feature when connecting to Wireless networks. The Private DNS encrypts your DNS queries so that your internet service provider and cybercriminals cannot monitor your browser activity. This feature improves protection and privacy throughout all your apps.
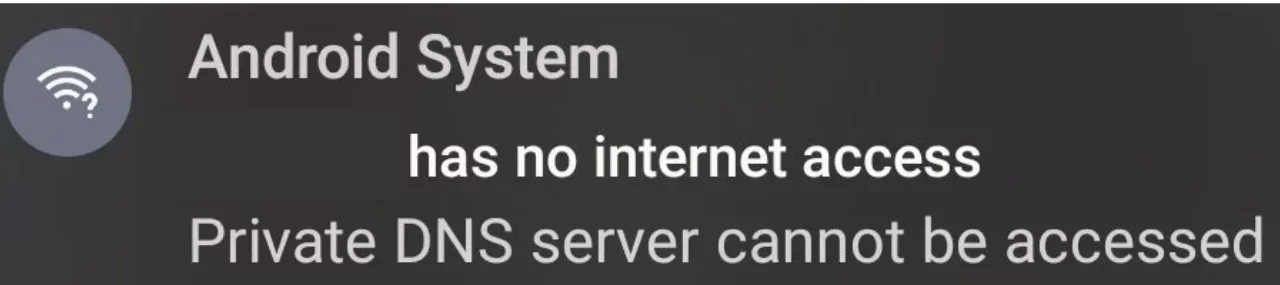
Sometimes when you try to connect to a public or home Wi-Fi network, you may get the annoying “Private DNS Server Cannot Be Accessed” response. This happens because some public network providers block public domain servers or your phone network settings will not allow connection to the internet.
In most cases, the mentioned issue may resolve itself after a few minutes, but it may take longer or never resolve itself. This is where we come in. In this article, we are going to take you through fixing this issue so that you can get back online.
Understanding the “Private DNS Server Cannot Be Accessed” Issue
The “Private DNS Server Cannot Be Accessed” error is a frequent frustration for Android device users who rely on private DNS settings to enhance their internet security and privacy. When this message appears, it means your device is unable to reach the private DNS server you’ve configured, which can disrupt your internet connection and prevent you from accessing websites or online services.
Private DNS servers play a crucial role in translating domain names into IP addresses, allowing your Android device to connect to the internet securely. By encrypting DNS queries, private DNS helps shield your browsing activity from your internet service provider and potential cyber threats. However, if the private DNS server cannot be accessed, your device cannot resolve domain names, resulting in a loss of internet access.
There are several reasons why the private DNS server cannot be accessed. Sometimes, there’s a conflict between the DNS server set on your phone and the DNS server used by the Wi-Fi network you’re connected to. In other cases, public networks—like those in cafes, schools, or offices—may block certain DNS servers, making it impossible for your device to connect. Misconfigured private DNS settings or entering an incorrect private DNS provider hostname can also lead to this issue.
To fix the problem, you can try a few different steps. Disabling private DNS or switching to the automatic option in your device’s settings often resolves the issue by allowing your phone to use a DNS server that supports internet access. Alternatively, you can manually set a private DNS provider hostname, such as Cloudflare or Google DNS, which are popular choices for secure and reliable DNS servers.
It’s also important to review your private DNS settings and verify that everything is configured correctly. If you’re still unable to connect, restarting your device or checking your internet connection can help. In some cases, network restrictions imposed by organizations or public Wi-Fi providers may be the cause, and you may need to contact your network administrator or internet service provider for assistance.
Understanding how private DNS works and knowing how to configure your settings can help you quickly resolve the “Private DNS Server Cannot Be Accessed” issue. By following the right troubleshooting steps and ensuring your DNS servers are set up properly, you can restore your internet connection and continue browsing securely on your Android device.
Potential Causes of the “Private DNS Cannot Be Accessed” Issue
In most cases, the DNS Server your phone is currently on is usually the problem, especially if a recent change in DNS settings has triggered the issue. Sometimes, DNS configurations do not work as intended due to conflicts between the phone’s DNS server and the Wi-Fi network’s DNS server, resulting in DNS settings not working properly or causing connectivity issues. In other cases, there is a conflict between the DNS Server your phone is using and the Wi-Fi network router’s DNS Server.
Resolving the “Private DNS Server Cannot Be Accessed” Problem
To resolve this issue, you can either switch off your phone’s Private DNS or switch it to the automatic option. Here is How:
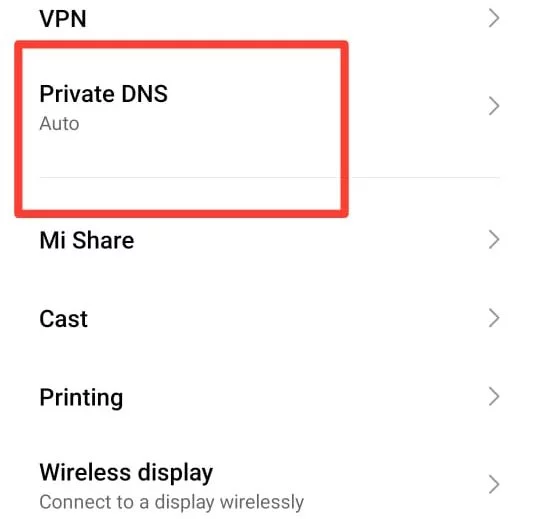
- Open the settings menu on your phone
- Go to the “Network and Internet Settings”
- Scroll down and click either the “Advanced Option” or “Other Internet Connections”
- Scroll down and choose “Private DNS” from the menu
- In the pop-up window, choose either the “Off” or “Automatic” option
- Finally, tap on the “Save” option to lock your settings.
You should be able to connect to the internet. Open your browser or another app to see if an internet connection is restored. Note that choosing the Off option means that you are browsing the internet without a Private DNS. The Automatic option, on the other hand, connects your phone to the available DNS Server that will allow an internet connection.
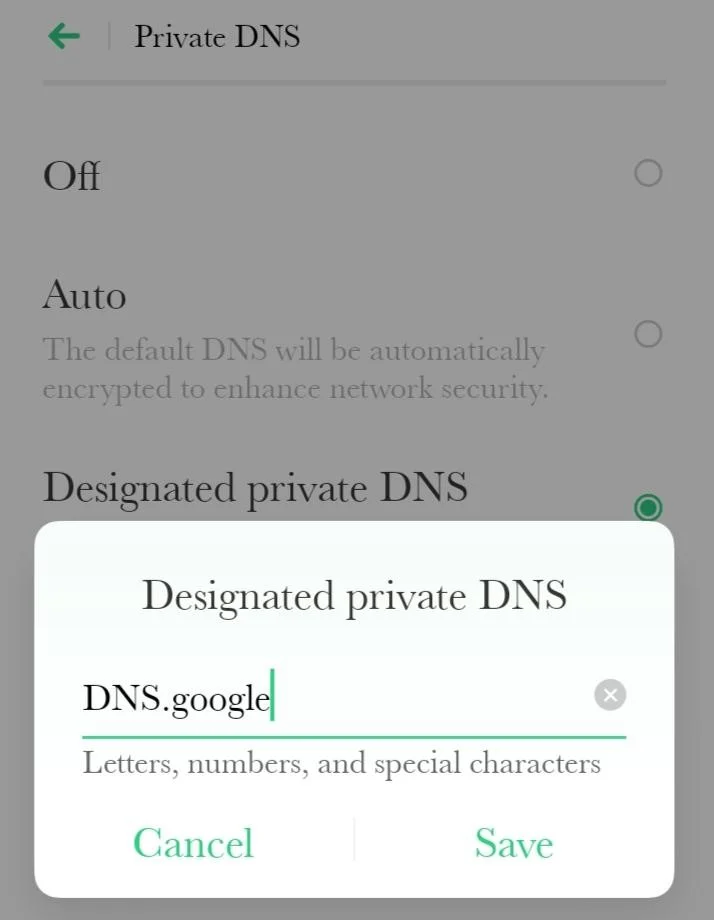
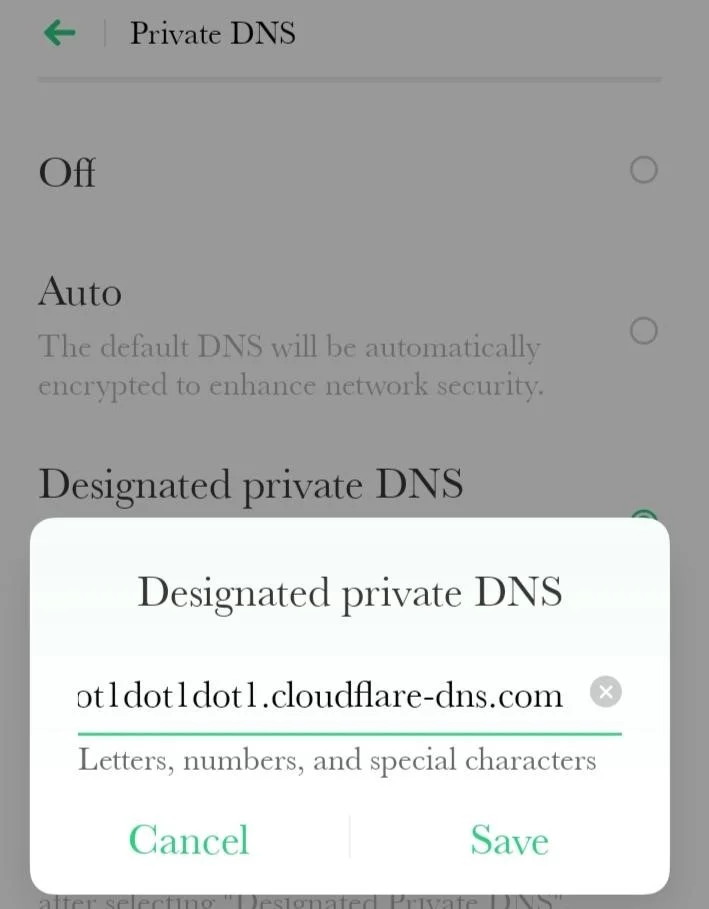
There is a third option on the Private DNS menu where you can set your phone’s DNS Server by entering your Private DNS provider hostname. Third-party DNS providers offer free DNS services that you can use to protect your online privacy. Cloudflare and Google DNS Servers are some of the most used Public DNS Servers you can connect to.
This is the option to use if you want to match your phone’s DNS Server to that of the Wi-Fi network’s router. To add this option:
- Proceed as above and choose the third option in step 5, “Private DNS provider hostname”
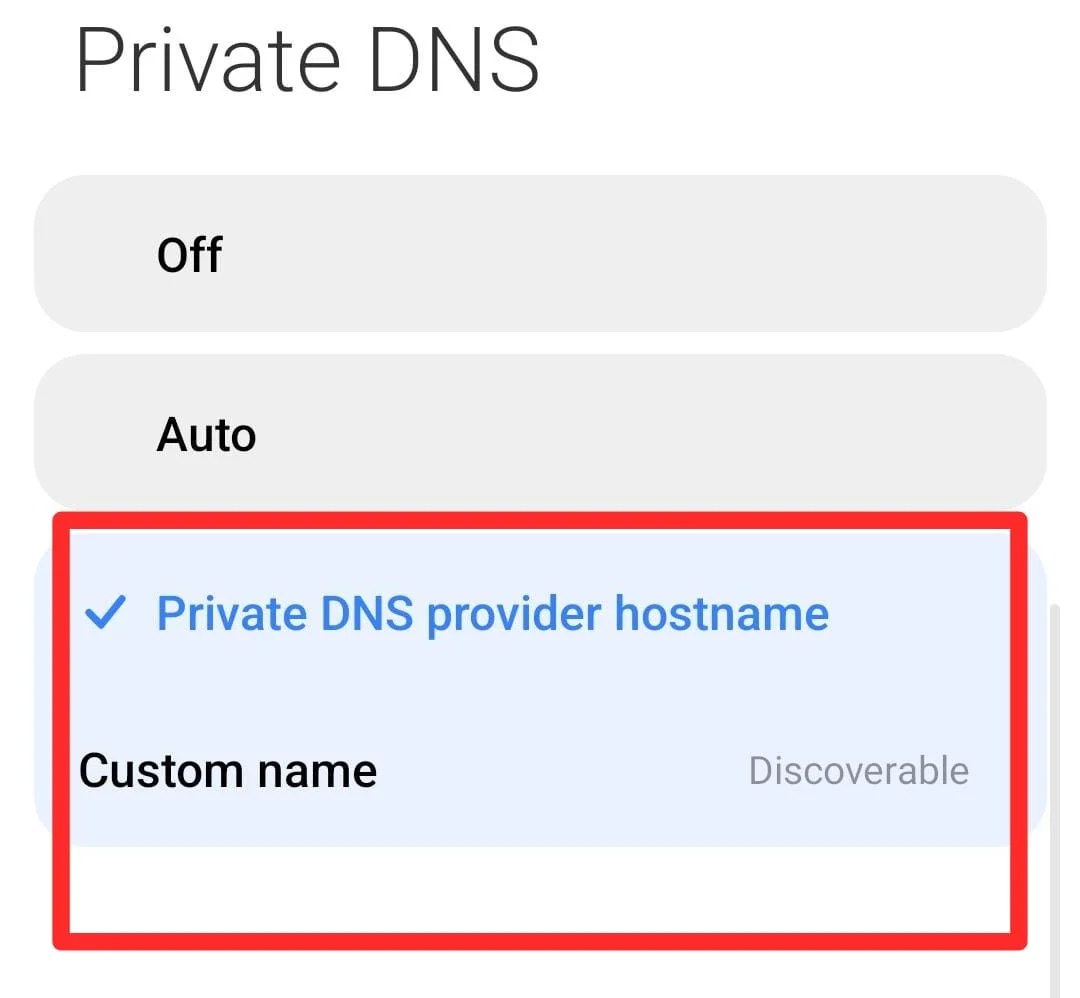
- Type in “DNS.google” as the hostname to use Google’s DNS Server, or
- Type in “1dot1dot1dot1.cloudflare-dns.com” to use Cloudflare DNS Server
By following these steps, you should be able to resolve the “Private DNS Server Cannot Be Accessed” issue on your Android phone and access the internet normally.
Private DNS Server Configuration and Security
Configuring a private DNS server on your Android device is a straightforward process that can significantly boost your online security. By entering a private DNS provider hostname in your device’s settings, you can direct all your DNS queries through a trusted DNS server, such as Cloudflare or Google DNS. This ensures that your internet traffic is encrypted and protected from potential threats.
Private DNS servers offer advanced security features, including blocking access to malicious websites and filtering out harmful content. To maximize these benefits, it’s essential to verify the authenticity of your chosen DNS provider and double-check your private DNS settings for accuracy. A secure private DNS server configuration not only shields you from phishing and malware attacks but can also improve your internet performance by providing faster and more reliable DNS resolution.
When setting up your private DNS, always use the official provider hostname and review your settings to ensure everything is correct. By taking these precautions and choosing a reputable private DNS provider, you can safeguard your Android device against DNS-based attacks and enjoy a private, secure, and seamless internet experience.