If your VPS is down/offline, you can start it using SolusVM. Here’s a step-by-step process that can help you in starting your VPS.
Step-by-Step Guide to Start/Boot Your VPS in SolusVM
Step 1: Access SolusVM Control Panel
- Open your web browser and go to the URL provided by your hosting provider for the SolusVM control panel. It typically looks something like https://yourprovider.com:5656.
- Log in to your SolusVM account using your username and password. This information should have been provided to you by your VPS hosting provider.
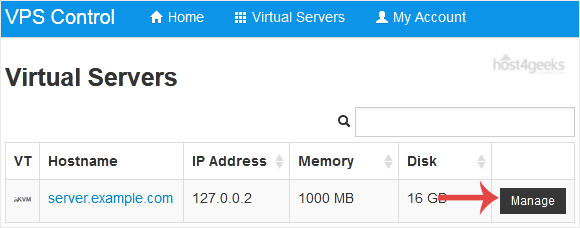
Step 2: Navigate to Your VPS Management Section
- Once logged in, you will see the SolusVM dashboard. Here, you can manage all your VPS servers.
- Find and click on the VPS you want to start/boot. This will take you to the management interface for that particular VPS.
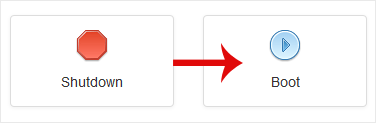
Step 3: Start/Boot Your VPS
- On the VPS management page, you will see several options and actions you can perform. Look for the “Boot” or “Start” button. It is usually prominently displayed, often with a power icon.
- Click on the “Boot” or “Start” button. This action will send a command to the server to boot up the VPS.
- If the VPS is already running, you might see options to restart or shutdown instead. Ensure that the VPS is in a powered-off state if you need to boot it from scratch.
Step 4: Confirm the Boot Process
- After clicking the boot button, you might see a confirmation prompt. Confirm that you want to start the VPS.
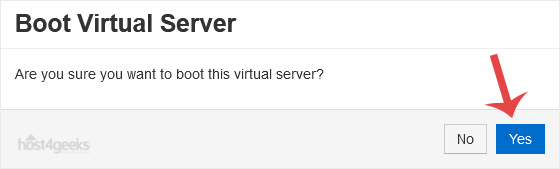
- The SolusVM panel will then show a status message indicating that the boot process has started. This might take a few moments.
Step 5: Monitor the Boot Process
- Watch the status indicators on the VPS management page. Once the VPS has successfully booted, the status will change to indicate that the VPS is running.
- You might also have access to a console view, which shows the boot process in real-time. This can be useful if you need to troubleshoot any issues that arise during boot.
Step 6: Verify VPS Functionality
- Log in to your VPS to ensure it has booted correctly. You can do this through SSH (Secure Shell) or any other remote management tool you use.
- Open your terminal or SSH client.
- Connect to your VPS using the provided IP address and login credentials.
Step 7: Check Services and Applications
- Once logged in, check that all necessary services and applications are running as expected. This might include web servers, databases, or other software installed on your VPS.
- Use commands like systemctl status <service> or service <service> status to check the status of specific services.
Additional Tips:
- Regularly monitor your VPS: Use SolusVM to keep an eye on the resource usage, such as CPU, RAM, and disk space.
- Back up your data: Regularly back up your VPS to avoid data loss.
- Security: Ensure your VPS is secured with firewalls, updated software, and strong passwords.
By following these steps, you can effectively start or boot your VPS in SolusVM and ensure it runs smoothly.