You can send an email using Thunderbird. It is quite straightforward as you do not need to log in to the cPanel webmail manually. You can send an email directly using the Mozilla Thunderbird email client.
1. Open Mozilla Thunderbird.
![]()
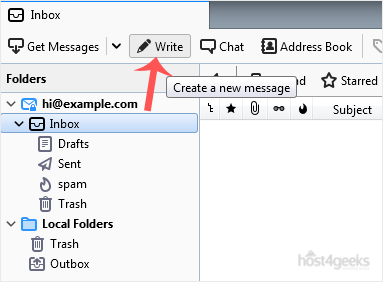
2. On the left side of the top menu, click on Write.

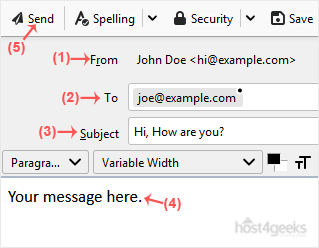
If you have multiple email accounts, click on your account, and a drop-down menu will open. Then select the appropriate email and enter the email account of the person you want to send an email to in the To field.
In the subject field, enter the subject of your email, enter your message in the Message box, and then click on Send.

Let’s move on to further explanation:
guide you through the process of forwarding an email in Mozilla Thunderbird in detail. Here’s a step-by-step guide:
- Open Thunderbird: Start by opening the Thunderbird application on your computer. If you haven’t already set it up, you’ll need to configure it with your email account(s) first.
- Select the Email to Forward: Navigate to the email you want to forward. You can find it in your Inbox or any other folder where you’ve saved it.
- Open the Email: Double-click on the email to open it in a new window. Alternatively, you can right-click on the email and select “Open in New Tab” or “Open in New Window” depending on your preference.
- Click on the Forward Button: In the email window, you should see a toolbar with various options. Look for the “Forward” button. It typically looks like a right-facing arrow. Click on this button to start the forwarding process.
- Enter the Recipient’s Email Address: Once you click on the Forward button, a new email composition window will appear. In the “To” field, enter the email address of the recipient(s) to whom you want to forward the email. You can enter multiple email addresses separated by commas if you’re sending the email to multiple recipients.
- Add a Message (Optional): Below the recipient’s email address field, there’s usually a space where you can add a message to accompany the forwarded email. You can include any additional information or context for the recipient if needed. This step is optional, but it can be helpful for providing context or explanations.
- Review and Edit the Forwarded Email (Optional): Before sending the forwarded email, you may want to review the content to ensure everything looks correct. You can scroll through the email body to make sure it includes all the original content, attachments, and any formatting. If necessary, you can also make edits or add comments.
- Attach Files (Optional): If the original email had any attachments that you want to include when forwarding, you can do so by clicking on the “Attach” button in the toolbar of the email composition window. This will allow you to browse your computer for files to attach.
- Send the Forwarded Email: Once you’re satisfied with the forwarded email and any additional details you’ve included, you can send it by clicking on the “Send” button in the toolbar. Thunderbird will then deliver the forwarded email to the recipient(s) you specified.
- Confirm Forwarding: After sending the email, you should see a confirmation message indicating that the email has been sent successfully. You can also check your “Sent” folder to verify that the forwarded email appears there.
That’s it! You’ve successfully forwarded an email in Mozilla Thunderbird.