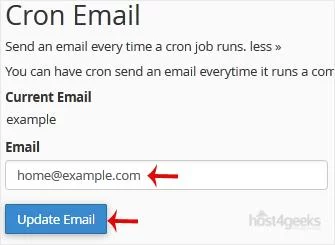
Updating a cronjob email address in cPanel ensures you receive notifications and alerts about your cronjob’s execution results. Here’s a detailed guide on how to update the cronjob email address in cPanel for Host4Geeks users:
Step-by-Step Guide to Updating a Cronjob Email Address in cPanel
1. Log into cPanel
- Access cPanel
Open your web browser and enter the cPanel login URL provided by Host4Geeks. This is typically something like https://yourdomain.com/cpanel or https://yourdomain.com:2083.
- Login Credentials
Enter your cPanel username and password to log in.
2. Navigate to the Cronjobs Section
- Dashboard View
Once you are logged into cPanel, you will see the main dashboard with various sections and icons.
- Search Bar
You can use the search bar at the top to quickly find settings and tools. Type “cronjobs” into the search bar.
- Advanced Section
Alternatively, scroll down to the “Advanced” section in the main dashboard. This is where you will typically find the Cronjobs icon.
3. Access the Cronjobs Interface
- Cronjobs Icon
Look for the “Cronjobs” icon within the Advanced section. The icon is usually labeled clearly.
![]()
- Click on the Icon
Click on the Cronjobs icon to access the cronjobs interface.
4. Update the Cronjob Email Address
- Email Address Field
At the top of the Cronjobs page, you will see a field labeled “Cron Email” or “Email”.
- Enter New Email Address
In this field, enter the new email address where you want to receive notifications about your cronjobs.
- Update Email
Click the “Update Email” button (or similar) to save the new email address. This ensures that future cronjob execution results will be sent to this updated email address.
5. Verify the Change
- Success Message
After updating the email address, you should see a confirmation message indicating that the email address has been updated successfully.
- Test Email
To ensure the change was successful, you can create or edit a cronjob to send an email notification upon its next execution.
Managing Cronjobs
6. Editing Existing Cronjobs
- Existing Cronjobs
Below the email address field, you will see a list of your existing cronjobs.
- Edit a Cronjob
To edit an existing cronjob, click the “Edit” button next to the cronjob you want to modify.
- Save Changes
After making any necessary changes, save the cronjob configuration.
7. Creating a New Cronjob
- Add New CronJob
To add a new cronjob, scroll down to the “Add New CronJob” section.
- Command and Timing
Specify the command to be executed and the timing (minute, hour, day, month, weekday) for the cronjob.
- Add Cronjob
Click the “Add New CronJob” button to save the new job.

Additional Tips for Managing Cronjobs
- Email Notifications
Cronjob emails can help you monitor the success or failure of your scheduled tasks. Ensure the email address used is one you check regularly.
- Avoid Spam
If you receive too many emails from cronjobs, you can modify the command to reduce email notifications. For example, you can redirect output to /dev/null if you do not need to see the execution results.
your-command > /dev/null 2>&1
- Log Files
For important cronjobs, consider logging output to a file for later review instead of or in addition to receiving emails.
Troubleshooting
- No Emails Received: If you are not receiving emails, check your spam/junk folder. Ensure the email address is correct and that your hosting provider allows email notifications from cronjobs.
- Incorrect Commands: Ensure your cronjob commands are correct and executable. Incorrect commands can lead to failure notifications.
Contacting Support
For any issues or additional help, you can reach out to Host4Geeks customer support through:
- Support Portal: Access the support portal from your Host4Geeks account.
- Live Chat: Use the live chat feature on the Host4Geeks website.
- Email: Send an email to the Host4Geeks support team.
By following these detailed steps, you can easily update the cronjob email address in cPanel on Host4Geeks, ensuring you stay informed about the execution of your scheduled tasks.