
In the bustling world of digital content creation, timing is everything. WordPress, one of the most popular content management systems, offers a powerful feature that allows users to schedule posts for future publication.
This feature not only streamlines content management but also enables bloggers, businesses, and publishers to maintain a consistent posting schedule, engage with their audience effectively, and improve their overall content strategy.
In this guide on how to Schedule posts in WordPress, we’ll dig into the significance of scheduling posts in WordPress and provide a detailed, step-by-step tutorial for both beginners and expert users.
The Significance of Scheduling Posts in WordPress:
Scheduling posts in WordPress holds immense significance for content creators and website administrators alike.
Here’s why:
1. Consistency:
Consistency is key to building and maintaining an engaged audience. By scheduling posts in advance, you can ensure a steady flow of content without having to manually publish each post.
2. Time Management:
Scheduling posts allows you to plan your content calendar in advance, saving time and effort in the long run. It enables you to focus on creating quality content while WordPress takes care of the publishing logistics.
3. Reach Optimization:
Timing plays a crucial role in reaching your target audience. By scheduling posts at peak times, you can maximize engagement and visibility, thereby increasing the likelihood of your content being seen and shared.
4. Flexibility:
Scheduling posts offers flexibility, allowing you to cater to different time zones and schedules. Whether you’re on vacation or busy with other tasks, scheduled posts ensure that your website remains active and updated.
5. SEO Benefits:
Regularly updated content is favored by search engines, and scheduling posts helps you maintain a consistent publishing frequency, which can positively impact your website’s search engine rankings.
Now, let’s explore how to schedule posts in WordPress, catering to both beginners and expert users.
Step-by-Step Guide: How to Schedule Posts in WordPress
For Beginners:
Step 1: Log in to your WordPress Dashboard:
Navigate to your WordPress website’s admin area and log in using your credentials.
Step 2: Create a New Post or Edit an Existing One:
To schedule a new post, click on “Posts” in the WordPress dashboard sidebar, then select “Add New.” If you want to schedule an existing draft, locate the post you wish to schedule under “Posts” and click on “Edit.”
Step 3: Write or Edit Your Post:
Compose your post content using the WordPress editor. You can add text, images, videos, and other multimedia elements as needed.
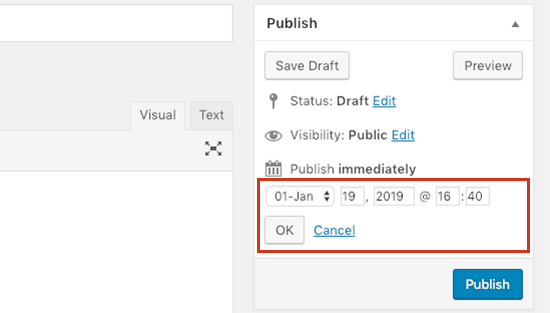
Step 4: Set the Publishing Date and Time:
In the WordPress editor, locate the “Publish” box on the right-hand side. By default, it will display the option to publish immediately. Click on the “Edit” link next to “Publish immediately” to reveal the date and time settings.
Step 5: Choose the Future Date and Time:
Select the date and time you want your post to be published. Once you’ve set the desired publishing date and time, click “OK.”
Step 6: Preview Your Scheduled Post:
Before scheduling your post, you can preview how it will appear on your website by clicking the “Preview” button.
Step 7: Schedule Your Post:
Once you’re satisfied with your post and publishing schedule, click the “Schedule” button. WordPress will now automatically publish your post at the specified date and time.
For Expert Users:
In addition to the basic steps outlined above, expert users can leverage additional features and techniques to optimize their scheduling workflow:
1. Time zone Management:
WordPress allows you to set your website’s time zone under Settings > General. Ensure that your time zone is correctly configured to avoid any scheduling discrepancies, especially if you’re targeting audiences in different time zones.
2. Editorial Calendar Plugins:
Consider installing editorial calendar plugins like “Editorial Calendar” or “CoSchedule” to visualize and manage your content schedule more efficiently.
These plugins offer advanced features such as drag-and-drop scheduling, team collaboration, and content organization.
3. Batch Scheduling:
Instead of scheduling posts individually, expert users can batch schedule multiple posts at once using the bulk editing feature. Simply select the posts you want to schedule, click on the “Edit” option in the bulk actions dropdown, set the desired publishing date and time, and save your changes.
4. Automated Publishing:
For websites with a high volume of content, automated publishing tools like “WP Scheduled Posts” or “Auto Scheduler” can automate the scheduling process based on predefined criteria such as post category, tags, or keywords.

Conclusion:
Mastering the art of scheduling posts in WordPress is essential for maintaining a consistent content strategy, engaging your audience effectively, and optimizing your website’s performance.
Whether you’re a beginner or an expert user, WordPress offers powerful tools and features to streamline the scheduling process and enhance your overall content management experience.
By following the step-by-step guide outlined in this article on how to schedule posts in WordPress, you’ll be well-equipped to harness the full potential of scheduling posts in WordPress and take your content strategy to the next level.