WordPress, the world’s leading content management system, powers millions of websites across the globe. While WordPress offers flexibility and ease of use, users often encounter technical challenges, one of which is the memory limit error.
This error occurs when WordPress exhausts the allocated memory limit, leading to sluggish performance or even complete site downtime. Resolving the WordPress memory limit error is crucial for maintaining a smooth and efficient website operation.
In this guide on how to resolve the WordPress Memory Limit Error, we will delve into the significance of resolving this error and provide a step-by-step process along with its pros and cons.
Significance of Resolving the WordPress Memory Limit Error:
The memory limit error in WordPress can significantly impact the performance and functionality of your website.
Some of the key reasons why resolving this error is crucial include:
1. Improved Performance:
By increasing the memory limit, you can enhance the performance of your WordPress website, ensuring faster loading times and smoother navigation for visitors.
2. Prevention of Downtime:
Exceeding the memory limit can lead to site crashes or downtime, resulting in a loss of potential customers and revenue. Resolving the memory limit error helps prevent such disruptions.
3. Enhanced Stability:
A higher memory limit ensures that your website can handle complex operations and plugins without encountering memory-related issues, thereby improving its overall stability.
4. Better User Experience:
A well-optimized website with sufficient memory resources provides users with a seamless browsing experience, leading to higher engagement and satisfaction.
Step-by-Step Process to Resolve the WordPress Memory Limit Error:
Here’s a detailed guide on how to resolve the WordPress memory limit error:
1. Identify the Error:
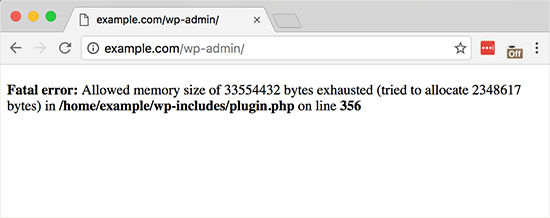
The first step is to identify whether your website is experiencing a memory limit error. Common symptoms include slow loading times, error messages such as “Fatal error: Allowed memory size exhausted,” or an inability to access the WordPress dashboard.
2. Check Current Memory Limit:
- Access your WordPress site’s root directory via FTP or cPanel File Manager.
- Locate the wp-config.php file and download it to your local machine.
- Open the wp-config.php file using a text editor and search for the line that defines the memory limit (usually defined as `define(‘WP_MEMORY_LIMIT’, ’64M’);`).
- Take note of the current memory limit value.
3. Increase Memory Limit:
- To increase the memory limit, you can add the following line of code just before the line that defines the memory limit:
Replace ‘256M’ with the desired memory limit value. Typically, a value of 256MB is sufficient for most WordPress websites.
- Save the changes to the wp-config.php file and upload it back to your server, overwriting the existing file if necessary.
4. Verify Changes:
- After updating the memory limit, visit your WordPress website and check if the memory limit error persists.
- You can verify the changes by installing and activating a WordPress plugin like WP Server Stats, which displays server information including the memory limit.
5. Optimize Plugins and Themes:
- Review the plugins and themes installed on your WordPress site.
- Deactivate any unnecessary plugins and switch to a lightweight theme to reduce memory usage.
- Optimize existing plugins and themes by updating them to the latest versions and removing any unused or outdated ones.
6. Consider Server Configuration:
- If increasing the memory limit does not resolve the issue, consider contacting your web hosting provider to inquire about server configuration options.
- Upgrading to a higher-tier hosting plan or switching to a hosting provider that offers better resource allocation may help alleviate memory limit constraints.
7. Monitor Performance:
- Regularly monitor your website’s performance using tools like Google PageSpeed Insights or Pingdom.
- Keep an eye on memory usage and address any potential issues promptly to ensure optimal performance.
Pros and Cons of Resolving the WordPress Memory Limit Error:
Pros:
- Improved website performance and stability.
- Prevention of site crashes and downtime.
- Enhanced user experience and engagement.
- Ability to handle complex operations and plugins effectively.
Cons:
- Requires technical knowledge to modify server settings or code.
- Increasing memory limit may incur additional hosting costs.
- Some memory-related issues may persist due to underlying factors beyond memory limit constraints.
Conclusion:
Resolving the WordPress memory limit error is essential for maintaining a high-performing and stable website.
By following the step-by-step process outlined in this guide on how to resolve the WordPress Memory Limit Error, you can effectively increase the memory limit and optimize your WordPress site for better performance.
Regular monitoring and optimization of plugins, themes, and server configuration will ensure continued success in managing memory resources and delivering an exceptional user experience.
