


WordPress is one of the most popular content management systems (CMS) globally, powering over 40% of websites on the internet. While many users are familiar with using WordPress online, installing it locally on your computer can be incredibly beneficial.
Installing WordPress locally allows users to create and test websites offline, experiment with themes and plugins, and learn how to use the platform without affecting a live site.
In this comprehensive guide on how to Install WordPress locally, we’ll walk you through the step-by-step process of installing WordPress locally, catering to both beginners and expert users, while also discussing its significance and the pros and cons associated with this method.
Significance of Installing WordPress Locally:
Installing WordPress locally offers several advantages:
1. Offline Development:
By installing WordPress locally, users can develop websites offline, which is particularly useful for those in areas with limited or unreliable internet connectivity.
2. Testing Environment:
Local installations provide a safe environment to test themes, plugins, and website configurations without affecting a live website. This allows users to experiment freely and learn without the risk of breaking their live site.
3. Learning Opportunity:
For beginners, installing WordPress locally offers a hands-on learning experience. Users can explore the platform’s features, experiment with customization options, and gain confidence in managing WordPress websites.
4. Speed and Efficiency:
Local installations are typically faster than working on a live server since all files and data are stored locally on the computer. This results in quicker loading times and a smoother development process.
5. Privacy and Security:
Since the website is only accessible locally, there are no security concerns associated with exposing it to the internet. This ensures privacy and security during the development phase.
Step-by-Step Guide: How to Install WordPress Locally
Step 1: Choose a Local Server Environment
Before installing WordPress, you need to set up a local server environment on your computer. There are several options available, but two popular choices are XAMPP and MAMP. These software packages include Apache, MySQL, and PHP, creating a server environment compatible with WordPress.
- For Beginners:
Download XAMPP or MAMP from their respective websites and follow the installation instructions provided.
- For Experts:
Consider alternatives like Docker or setting up a local server manually using software like Apache and MySQL.
Step 2: Download WordPress
Once your local server environment is set up, download the latest version of WordPress from wordpress.org. Extract the WordPress zip file to a folder on your computer.
- For Beginners:
Visit wordpress.org, click on the “Get WordPress” button, and download the zip file to your computer. Extract the contents using a file extractor like WinRAR or 7-Zip.
- For Experts:
Alternatively, use command-line tools like wget or curl to download WordPress directly to your computer.
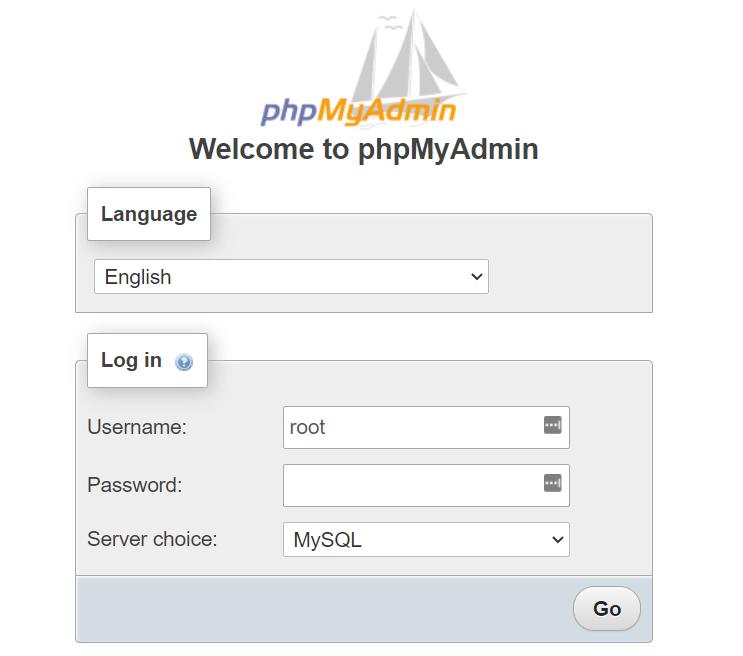
Step 3: Create a Database
WordPress requires a database to store website data. Using your local server’s control panel (usually accessed through a web browser), create a new database for your WordPress installation. Note down the database name, username, and password, as you’ll need these later during the WordPress setup.
- For Beginners:
Follow the instructions provided by XAMPP or MAMP to create a new database through their control panel.
- For Experts:
Use command-line tools like MySQL or phpMyAdmin to create a database manually.
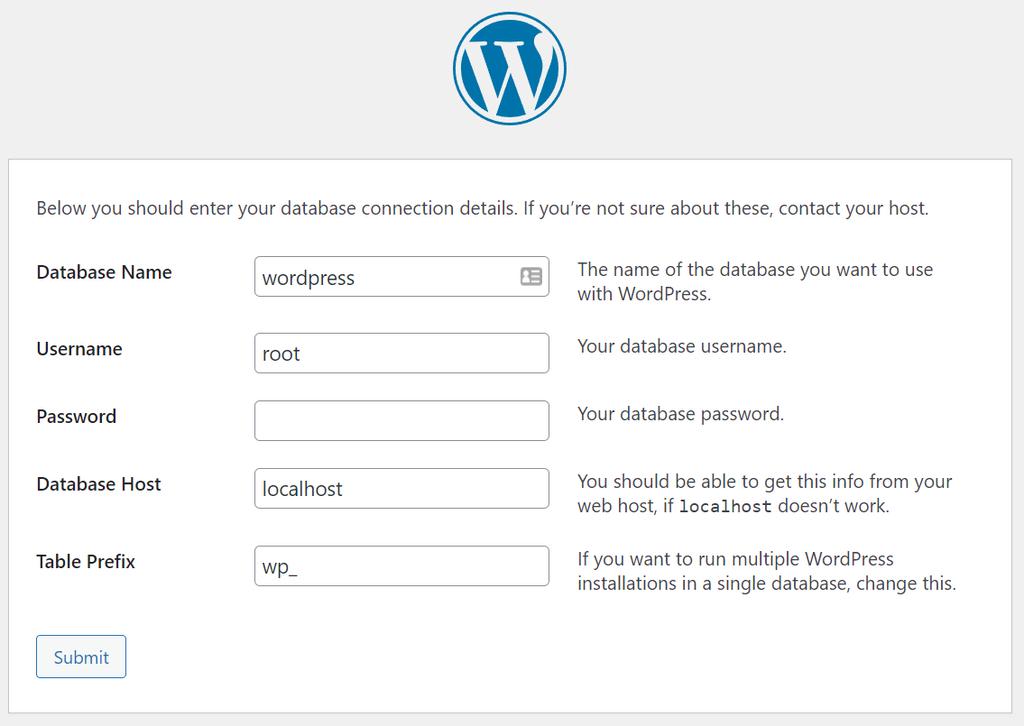
Step 4: Configure wp-config.php
In the folder where you extracted WordPress, locate the wp-config-sample.php file and rename it to wp-config.php. Open this file in a text editor and enter the database information you obtained in the previous step (database name, username, and password). Save the changes and close the file.
- For Beginners:
Use a simple text editor like Notepad or TextEdit to edit wp-config.php and enter the database details.
- For Experts:
Consider using code editors like Visual Studio Code or Sublime Text for a more streamlined editing experience.
Step 5: Install WordPress
Open your web browser and navigate to the localhost address associated with your local server environment (e.g., http://localhost/wordpress). Follow the on-screen instructions to complete the WordPress installation process, including providing a site title, username, password, and email address for the admin account.
- For Beginners:
The installation process is straightforward and involves filling out a form with basic information about your website and admin account.
- For Experts:
You can customize the installation by modifying the wp-config.php file or using command-line tools to install WordPress.
Step 6: Access Your Local WordPress Site
Once the installation is complete, you can access your local WordPress site by entering the localhost address in your web browser. Log in using the admin credentials you provided during the installation process.
- For Beginners:
Bookmark the localhost address for easy access to your local WordPress site in the future.
- For Experts:
Consider using virtual hosts or custom domain names to access multiple local WordPress sites simultaneously.
Pros and Cons of Installing WordPress Locally:
Pros:
1. Offline development environment for testing and learning.
2. Faster website performance and development process.
3. Privacy and security without exposing the website to the internet.
4. Customizable server environment for advanced users.
5. No hosting fees or internet dependency.
Cons:
1. Limited collaboration options for team projects.
2. Differences in local and live server environments may cause compatibility issues.
3. Requires technical knowledge for setup and troubleshooting.
4. Not suitable for testing website performance under real-world conditions.
5. Updates and backups are the responsibility of the user.
Conclusion:
Installing WordPress locally is a valuable skill for both beginners and expert users, offering a controlled environment for website development, testing, and learning.
By following the step-by-step guide provided in this article on how to install WordPress locally, users can set up a local WordPress installation with ease and reap the benefits of offline development.
However, it’s essential to weigh the pros and cons and consider your specific needs before opting for a local installation.
Whether you’re a novice looking to explore WordPress or a seasoned developer seeking a sandbox environment, installing WordPress locally opens up a world of possibilities for website creation and experimentation.


Leave a Reply