


In the ever-evolving landscape of the digital realm, website owners often find themselves needing to migrate their WordPress site from one server to another. Whether it’s due to upgrading hosting providers, redesigning the website, or simply seeking better performance, WordPress migration is a common task that many website owners undertake.
While it may sound daunting at first, with the right guidance, anyone can successfully migrate their WordPress site on their own. In this comprehensive guide, we’ll delve into the ins and outs of WordPress migration, exploring its overall usage, effectiveness, and providing simple steps to understand how to do a WordPress migration on your own.
Understanding WordPress Migration:
WordPress migration refers to the process of transferring all of your website’s files, databases, themes, plugins, and settings from one server to another. This could involve moving your site from a local environment to a live server, switching hosting providers, or even cloning your site for testing purposes.
Regardless of the reason, the goal remains the same: to seamlessly transition your WordPress site while minimizing downtime and avoiding data loss.
The Effectiveness of WordPress Migration:
The effectiveness of WordPress migration cannot be overstated. It allows website owners to harness the full potential of their site by ensuring optimal performance, improved security, and enhanced scalability.
By migrating to a more robust hosting environment, you can experience faster loading times, better uptime, and greater flexibility in managing your site’s resources.
Additionally, migrating your WordPress site opens up opportunities for expansion, enabling you to explore new features, themes, and plugins to enhance your online presence.
How to Do a WordPress Migration on Your Own:
Now, let’s dive into the step-by-step process of migrating your WordPress site on your own:
- Backup Your Website: Before initiating the migration process, it’s crucial to create a backup of your entire WordPress site. This includes both the files and the database. You can use plugins like UpdraftPlus or manually backup via your hosting provider’s control panel.
- Export Your Database: Access your current hosting account’s control panel (usually cPanel) and navigate to phpMyAdmin. Select your WordPress database and choose the export option. Save the exported .sql file to your computer.
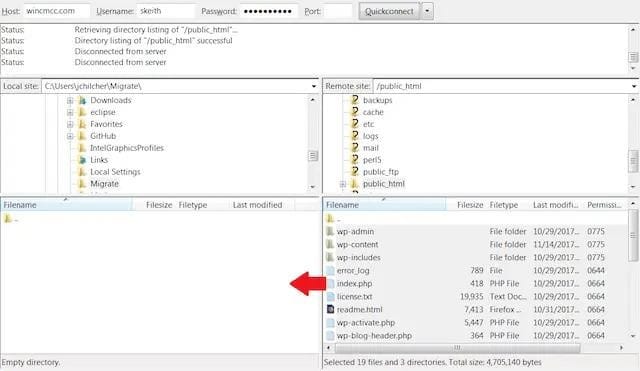
- Transfer Files: Using an FTP client (such as FileZilla), connect to your current hosting server and download all the files from your WordPress directory to your local computer.
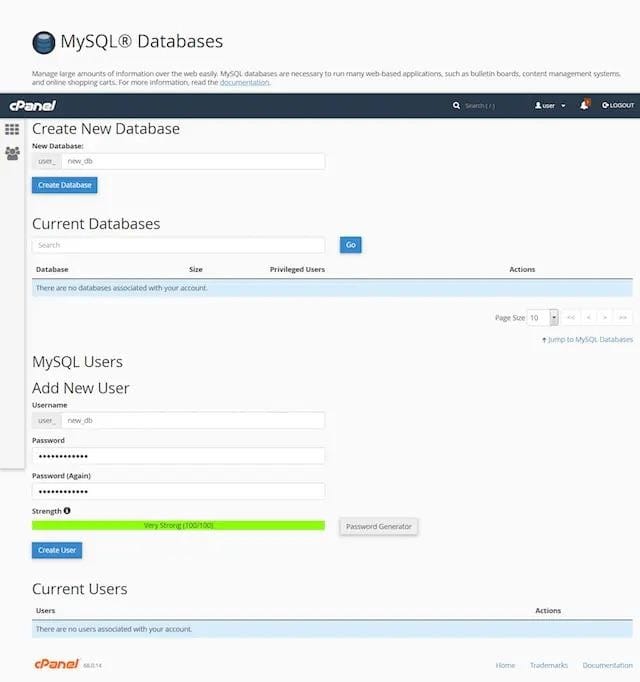
- Create a New Database: Log in to your new hosting account’s control panel and create a new MySQL database. Note down the database name, username, and password as you’ll need them later.
- Import Database: In the new hosting account’s control panel, access phpMyAdmin and import the .sql file you exported earlier. This will populate the new database with your WordPress content.
- Update wp-config.php: Using a text editor, open the wp-config.php file in your WordPress directory on your local computer. Update the database name, username, password, and host to match the details of your new hosting account.
- Upload Files: Using the FTP client, upload all the files from your WordPress directory to the corresponding directory on your new hosting server.
- Update Domain: If you’re changing your domain during the migration, update the WordPress Address (URL) and Site Address (URL) fields in the Settings > General tab of your WordPress dashboard.
- Modify DNS Settings: Update your domain’s DNS settings to point to the nameservers provided by your new hosting provider. This step may take some time to propagate across the internet.
- Test Your Site: Once the DNS changes have propagated, visit your new domain to ensure that your WordPress site is functioning correctly. Check for any broken links, missing images, or other issues.
Congratulations! You have successfully migrated your WordPress site to a new hosting server on your own.
Pros and Cons of Migrating a WordPress Site on Your Own:
While migrating a WordPress site on your own can be a rewarding experience, it’s essential to weigh the pros and cons:
Pros:
- Cost Savings: Migrating your WordPress site on your own eliminates the need to hire a professional, saving you money in the process.
- Control: You have full control over the migration process, allowing you to customize it according to your specific requirements.
- Learning Opportunity: Migrating your WordPress site on your own provides valuable learning experience and empowers you to better understand your website’s architecture.
Cons:
- Technical Complexity: WordPress migration requires technical knowledge of databases, FTP, and DNS settings, which can be challenging for beginners.
- Time-Consuming: The migration process can be time-consuming, especially if you encounter any issues along the way.
- Risk of Data Loss: Without proper backups and precautions, there’s a risk of data loss during the migration process.
Final Thoughts:
In conclusion, WordPress migration is a fundamental task for website owners looking to optimize their online presence. By following the simple steps outlined in this guide and weighing the pros and cons, you understand successfully how to do a WordPress migration on your own, unlocking its full potential and ensuring seamless continuity in your online journey.


Leave a Reply