


If you’ve been a WordPress user for some time, you’ve probably noticed that WordPress introduced a new editor a few versions back—the Gutenberg Editor. It arrived with WordPress 5.0 and brought a lot of changes, especially the concept of using blocks for every piece of content. While some people love this new, flexible editor, others find it a bit too complex and miss the simplicity of the Classic Editor.
Are you one of those who wish to go back to the old, reliable editor you knew like the back of your hand? You’re not alone! Many bloggers, writers, and even web developers prefer the Classic Editor for its straightforward approach to content creation. If you’re here, you probably want to know how to re-enable the Classic Editor on your site and leave the blocks behind. Let’s walk through the steps together.
Why Do Some People Prefer the Classic Editor?
Before we dive into the “how,” let’s talk about the “why.” It might help you understand why WordPress hasn’t just completely removed the Classic Editor. Here are a few reasons why some people, perhaps like you, still prefer the Classic Editor:
- It’s Simple: The Classic Editor feels a lot like a traditional text editor, like Microsoft Word or Google Docs. You type, you format, you’re done. There’s no need to think about blocks, and for some users, that’s a big plus.
- It’s Familiar: If you’ve been using WordPress for years, you’ve likely become comfortable with the Classic Editor. You know where everything is and how to do what you need quickly. Gutenberg’s blocks are exciting but can feel like learning a new tool altogether.
- It’s Less Distracting: The Classic Editor allows you to focus purely on your writing. With Gutenberg, you’re constantly dealing with blocks and layout options that might shift your focus away from content creation and more toward design.
For many users, it’s not about rejecting Gutenberg—it’s about keeping things simple and focusing on what they love: writing.
How to Re-Enable the Classic Editor in WordPress
Now, let’s dive into the steps to bring back the Classic Editor. we’ll walk you through several methods, so you can choose the one that works best for you.
Method 1: Using the Classic Editor Plugin
The easiest way to bring back the Classic Editor is with a plugin. WordPress officially supports the Classic Editor Plugin, which you can install for free. Here’s how to set it up:
- Head to Your WordPress Dashboard: First, log into your WordPress dashboard. This is the control panel where you manage your website.
- Go to Plugins > Add New: On the left-hand sidebar, look for “Plugins.” Click on it, and then click “Add New.” This will take you to the WordPress Plugin Directory, where you can search for plugins.

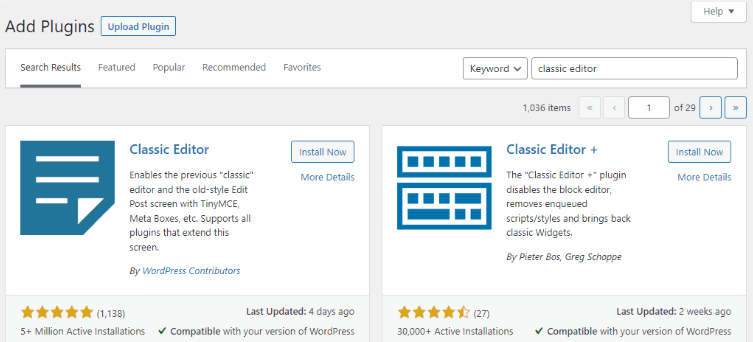
- Search for “Classic Editor”: In the search bar at the top-right, type in “Classic Editor.” You’ll see the plugin pop up. It’s developed by WordPress Contributors, and you’ll likely see it has over five million active installations.
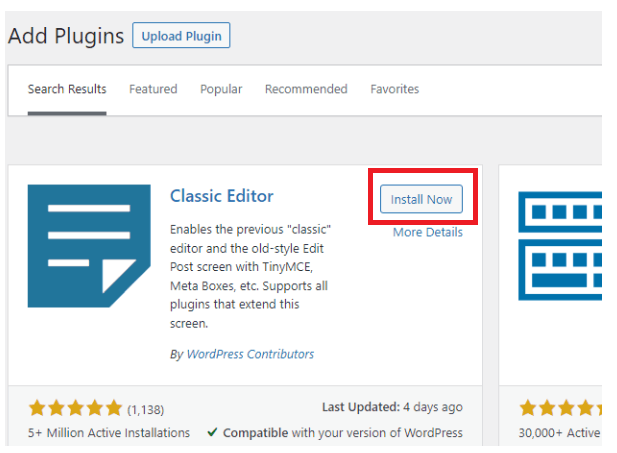
- Install and Activate the Plugin: Click “Install Now” to install the plugin
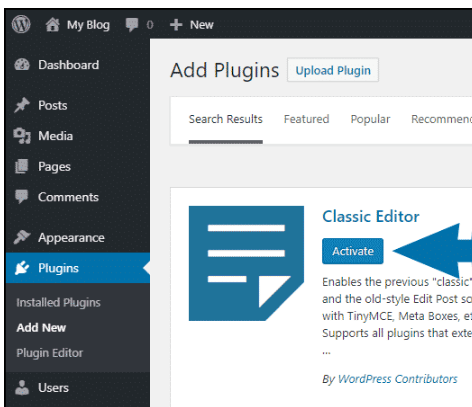
- After a moment, the button will change to “Activate.” Click “Activate” to enable the Classic Editor on your site.
- Check Your Settings: After activation, go to Settings > Writing in your dashboard.
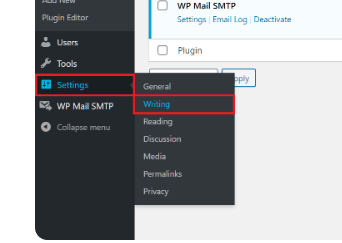
- Here, you’ll see some options to configure how the editor behaves. You can set the Classic Editor as the default editor for all users or allow users to switch between the Classic Editor and Gutenberg.

Once you complete these steps, you’re all set! Next time you create a new post, the Classic Editor will appear as your default editor. If you miss the simplicity of a clean, distraction-free writing space, this plugin should feel like a breath of fresh air.
Additional Tip: Don’t forget to keep your plugins updated to ensure compatibility with new WordPress releases.
Method 2: Disable Gutenberg with Code (For Advanced Users)
If you’re comfortable with a little bit of coding, there’s another way to disable the Gutenberg Editor. You can add a simple code snippet to your theme’s functions.php file to achieve this. Let’s walk through it step by step:
- Access Your Functions.php File: In your WordPress dashboard, go to Appearance > Theme Editor. You’ll see a list of files on the right side; look for functions.php.
- Important: Before editing the functions.php file, make sure to back up your site. A single misplaced character can lead to errors, so having a backup ensures you can restore your site if something goes wrong.
- Add the Code: At the very bottom of the functions.php file, paste the following code snippet:

This code tells WordPress not to use the Block Editor (Gutenberg) for posts.
- Save Your Changes: Once you’ve added the code, click “Update File” to save it. When you create a new post, WordPress will automatically load the Classic Editor.
While this method might feel a bit technical, it gives you more control over how WordPress behaves, especially if you’re comfortable working with code. However, if you’re not sure about modifying theme files, stick with the plugin method to keep things simple.
Method 3: Using the Disable Gutenberg Plugin
Another option is the Disable Gutenberg plugin. This plugin gives you a bit more flexibility, as it allows you to disable Gutenberg only for specific types of content. Here’s how to use it:
- Install the Plugin: Navigate to Plugins > Add New, and search for “Disable Gutenberg.” Click “Install Now,” then “Activate.”
- Configure Plugin Settings: Go to Settings > Disable Gutenberg. Here, you’ll see options to disable Gutenberg for specific post types. You can disable it site-wide or choose to keep it for pages or custom post types.
With this plugin, you can create a mix-and-match experience, using the Classic Editor for certain posts and Gutenberg for others, which can be useful if you need the flexibility of both editors.
Classic Editor vs. Gutenberg: Which is Right for You?
When it comes to deciding between the Classic Editor and the Gutenberg (Block) Editor, it truly depends on your needs, preferences, and what you’re aiming to achieve with your WordPress site. Let’s look at some scenarios that might help you make a choice:
Choose the Classic Editor if:
- You’re a blogger, writer, or someone focused on creating written content quickly without fuss. The Classic Editor lets you concentrate on what you’re saying rather than how it’s presented.
- You’re comfortable with a simple text editor and prefer a more streamlined, linear layout for content creation. You don’t need the drag-and-drop functionality or advanced layout options of Gutenberg.
- You manage a website with a lot of content and want to stick with something tried-and-true, allowing you to be consistent in your formatting without needing to learn a new tool.
Choose the Gutenberg Editor if:
- You want more control over your layout and visual design. The Block Editor offers a broad range of blocks for multimedia, buttons, and dynamic content, making it perfect for those who like to experiment with visuals and structure.
- You’re building landing pages, product pages, or more interactive content that requires features like columns, galleries, or call-to-action blocks.
- You’re open to learning new tools and don’t mind a bit of a learning curve if it means getting more flexibility in how your posts and pages look.
The good news? You don’t have to commit to one or the other entirely. Many users combine both editors, using the Classic Editor for simpler blog posts and Gutenberg for more visually rich pages. By enabling both editors, you give yourself the flexibility to decide on a per-post or per-page basis, allowing you to benefit from both approaches.
Tips for Getting the Most Out of the Classic Editor
If you’re sticking with the Classic Editor, here are a few tips to enhance your experience:
Explore Keyboard Shortcuts: Just like other editors, the Classic Editor supports many common shortcuts that can streamline your writing process. Here are some handy ones:
Bold text: Ctrl + B
Italicize text: Ctrl + I
Underline text: Ctrl + U
Add a link: Ctrl + K
Undo: Ctrl + Z
Redo: Ctrl + Y
Mastering these shortcuts can save time and make your content creation experience smoother, especially if you’re someone who spends a lot of time drafting and formatting posts.
Add Extra Features with TinyMCE Advanced: The Classic Editor’s toolbar is minimal, but you can enhance it with the TinyMCE Advanced plugin. This plugin adds extra formatting buttons like font size, text color, and tables. It’s especially helpful if you frequently create content that requires more formatting options than the default editor provides.
Optimize Your Content with SEO Plugins: Since you’ll be focusing on content creation, make sure to enhance your posts for search engines. Yoast SEO and Rank Math are two fantastic SEO plugins that integrate perfectly with the Classic Editor. They offer live feedback as you write, letting you know if your keywords, headings, and readability meet SEO best practices.
Take Advantage of Custom Formatting Options: Did you know you can customize the editor even more with some simple CSS? If you’re familiar with a bit of coding, you can style your content directly within the editor.
For instance, you could set up custom heading styles, tweak your block quotes, or even add background colors to emphasize certain sections. There are plenty of online tutorials to guide you through making these edits if you’re interested in adding a personal touch to your writing environment.
Install Compatibility Plugins for Better Workflow: Sometimes, plugins are designed primarily for Gutenberg, but there’s often an alternative for the Classic Editor as well.
Look for Classic Editor-compatible plugins that enhance your workflow, such as page builders, contact forms, or media management tools that work seamlessly with the Classic Editor. A bit of research can help you find plugins that align perfectly with your content goals.
By following these tips, you can take full advantage of the Classic Editor’s simplicity while still accessing powerful tools to make your content shine.
Final Thoughts
Bringing back the Classic Editor in WordPress is a quick and easy process, whether you’re a beginner using a plugin or an advanced user comfortable with code. WordPress lets you choose the editing experience that best matches your needs.
For many users, especially those focused on creating straightforward content without distractions, the Classic Editor offers an unmatched writing experience.
Meanwhile, others are finding that Gutenberg’s block-based approach opens up exciting possibilities for more interactive and visually engaging content.
Ultimately, it’s about what works best for you and your workflow. Give both a try and stick with the one that feels most comfortable. Happy editing!


Leave a Reply