Monetizing your WordPress website is a key aspect of sustaining it and potentially turning it into a profitable venture.
One of the most popular methods of monetization is through Google AdSense, a platform that allows website owners to display targeted ads on their site and earn revenue when visitors interact with those ads.
In this comprehensive guide on how to add Google AdSense to WordPress, we’ll explore the significance of adding Google AdSense to WordPress, and provide step-by-step instructions for beginners and expert users alike.
Significance of Adding Google AdSense to WordPress:
1. Revenue Generation:
Google AdSense offers website owners a passive income stream by displaying ads relevant to their content. Each click or impression on these ads generates revenue for the website owner.
2. Easy Integration:
Integrating Google AdSense with WordPress is relatively simple, making it accessible to users of all skill levels. It doesn’t require extensive technical knowledge, and with the right plugins, the process becomes even easier.
3. Customization Options:
AdSense allows you to customize the appearance and placement of ads on your WordPress site to ensure they blend seamlessly with your content and maximize engagement without compromising user experience.
4. Access to Advertisers:
Through AdSense, you gain access to a vast network of advertisers, ensuring that the ads displayed on your site are relevant and appealing to your audience, thus increasing the likelihood of clicks and revenue.
5. Analytics and Insights:
Google AdSense provides detailed analytics and insights into ad performance, helping you optimize your ad strategy to maximize revenue.
Step-by-Step Guide for Beginners:
Step 1: Sign Up for Google AdSense
– Visit the Google AdSense website and sign up for an account using your Google credentials.
– Fill out the required information, including your website URL and payment details.
Step 2: Get AdSense Approval
– After signing up, Google will review your website to ensure it complies with their policies.
– Once approved, you’ll receive an email notification and can proceed to generate ad code.
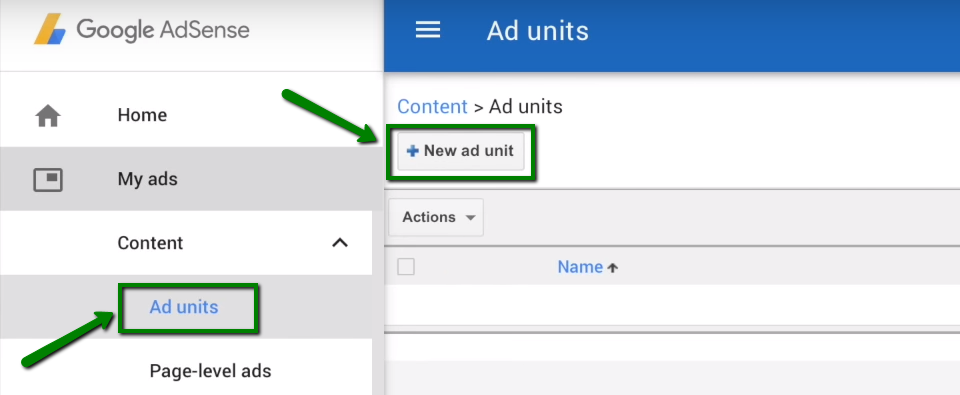
Step 3: Generate Ad Code
– Log in to your AdSense account and navigate to the “Ads” tab.
– Click on “Ad units” and then “New ad unit” to create a new ad.
– Customize the ad type, size, style, and other settings according to your preferences.
Step 4: Install AdSense Plugin
– In your WordPress dashboard, go to Plugins > Add New.
– Search for “AdSense Plugin” and install one of the popular plugins such as “Ad Inserter” or “Advanced Ads.”
– Activate the plugin once it’s installed.
Step 5: Configure Ad Settings
– In the plugin settings, paste the AdSense ad code you generated earlier.
– Configure the placement options, such as where you want the ads to appear within your content or sidebar.
Step 6: Monitor Performance
– Monitor your AdSense dashboard regularly to track ad performance, including clicks, impressions, and revenue.
– Use the insights to optimize your ad strategy and maximize revenue potential.
Step-by-Step Guide for Expert Users:
Step 1: Manual Ad Integration
– For expert users who prefer more control over ad placement, manually integrate AdSense ads into their WordPress theme.
– Locate the theme files where you want to display ads, such as single.php or sidebar.php.
– Insert the AdSense ad code directly into the theme files using the appropriate PHP functions.
Step 2: Custom Ad Styles
– Customize the appearance of AdSense ads to match your website’s design and branding.
– Use CSS styling to modify the ad colors, fonts, borders, and other visual elements.
– Ensure that the customized ads blend seamlessly with your content to enhance user experience.
Step 3: A/B Testing
– Conduct A/B testing to experiment with different ad placements, sizes, and styles to determine the most effective configurations.
– Use tools like Google Optimize or third-party plugins to create and analyze A/B tests, and optimize ad performance based on the results.
Step 4: Implement Responsive Ads
– Ensure that your AdSense ads are responsive and optimized for various screen sizes and devices.
– Use responsive ad units or implement media queries in your CSS to adjust ad sizes and layouts dynamically based on the user’s device.
Step 5: AdSense Policies Compliance
– Stay updated with Google AdSense policies and guidelines to ensure compliance and prevent violations that could result in account suspension or termination.
– Regularly review your website content and ad placements to ensure they adhere to AdSense policies regarding prohibited content, deceptive practices, and user experience.
Pros and Cons of Adding Google AdSense to WordPress:
Pros:
1. Passive Income:
Generate revenue through ad clicks and impressions without actively selling products or services.
2. Easy Integration:
Simple integration process, especially with WordPress plugins, making it accessible to beginners.
3. Customization Options:
Customize ad appearance and placement to suit your website’s design and optimize user engagement.
4. Detailed Analytics:
Access to comprehensive analytics and insights to track ad performance and optimize revenue.
5. Access to Advertisers:
Gain access to a vast network of advertisers, ensuring relevant and high-quality ads for your audience.
Cons:
1. Ad Clutter:
Excessive ads can clutter your website and detract from the user experience, potentially leading to increased bounce rates.
2. Revenue Dependence:
Your revenue is dependent on ad clicks and impressions, which can fluctuate based on various factors such as traffic and ad relevance.
3. Ad Blocking:
Some users may use ad-blocking software, reducing the visibility and effectiveness of AdSense ads.
4. Policy Compliance:
Adherence to AdSense policies is essential to avoid account suspension or termination, requiring ongoing monitoring and adjustment.
5. Revenue Share:
Google takes a percentage of ad revenue generated through AdSense, reducing the overall earnings potential for website owners.
Conclusion:
Adding Google AdSense to your WordPress website can be a lucrative opportunity to monetize your content and generate passive income.
Whether you’re a beginner or an expert user, the process of integrating AdSense is relatively straightforward, offering customization options and detailed analytics to optimize ad performance.
However, it’s essential to strike a balance between ad revenue and user experience, ensuring compliance with AdSense policies and maximizing revenue potential while maintaining a positive user experience.
By following the step-by-step guide and considering the pros and cons outlined in this article on how to add Google AdSense to WordPress, you can effectively integrate Google AdSense into your WordPress site and leverage its benefits for financial sustainability and growth.
