
In the competitive landscape of the digital world, website performance plays a pivotal role in determining success. One critical aspect of optimizing performance is leveraging Expires Headers, especially in WordPress websites.
In this guide on how to add expires headers in WordPress, we’ll delve into the significance of Expires Headers, catering to both beginners and expert-level users, while providing a step-by-step process on how to integrate them seamlessly into your WordPress site.
Understanding Expires Headers:
Expires Headers are essential components of HTTP headers that instruct the browser on how long it should cache a specific resource, such as images, CSS, JavaScript files, etc. When a user visits a website, their browser downloads various resources to render the page.
By setting Expires Headers, you dictate how long these resources can be stored in the browser’s cache before they are requested again from the server.
Significance of Expires Headers:
1. Improved Loading Speed:
By caching resources, Expires Headers reduce the number of HTTP requests to the server, thereby improving the loading speed of your website.
2. Bandwidth Conservation:
Caching resources reduces server load and conserves bandwidth, especially for repeat visitors, resulting in cost savings and better user experience.
3. Enhanced User Experience:
Faster loading times lead to improved user experience, reducing bounce rates and increasing engagement and conversions.
Beginner’s Guide: Adding Expires Headers in WordPress:
1. Identify Resources to Cache:
Determine which resources on your WordPress site can benefit from caching, such as images, CSS files, JavaScript files, etc.
2. Install and Activate a Caching Plugin:
For beginners, the easiest way to implement Expires Headers in WordPress is by using a caching plug-in. Popular choices include WP Super Cache, W3 Total Cache, and WP Rocket. Install and activate the plug-in of your choice from the WordPress dashboard.
3. Configure Caching Settings:
Once the plug-in is activated, navigate to its settings page. Look for options related to browser caching or Expires Headers. Configure the settings according to your requirements. Typically, you’ll find options to set expiry times for different types of resources.
4. Save Settings and Test:
After configuring the caching settings, save changes and test your website’s performance using tools like Google PageSpeed Insights or GTmetrix. Verify if the Expires Headers are properly set for cached resources.
Expert-Level Integration:
For users with a deeper understanding of WordPress and server configurations, a more hands-on approach to adding Expires Headers is possible:
1. Access Server Configuration:
If you have access to your server configuration files (such as .htaccess for Apache servers), you can manually add Expires Headers directives. Access these files using an FTP client or through your hosting provider’s file manager.
2. Edit .htaccess File:
Open the .htaccess file located in the root directory of your WordPress installation. Add the following code snippets to set Expires Headers for different types of resources:
This code snippet sets Expires Headers for common types of resources. Adjust the expiry times according to your requirements.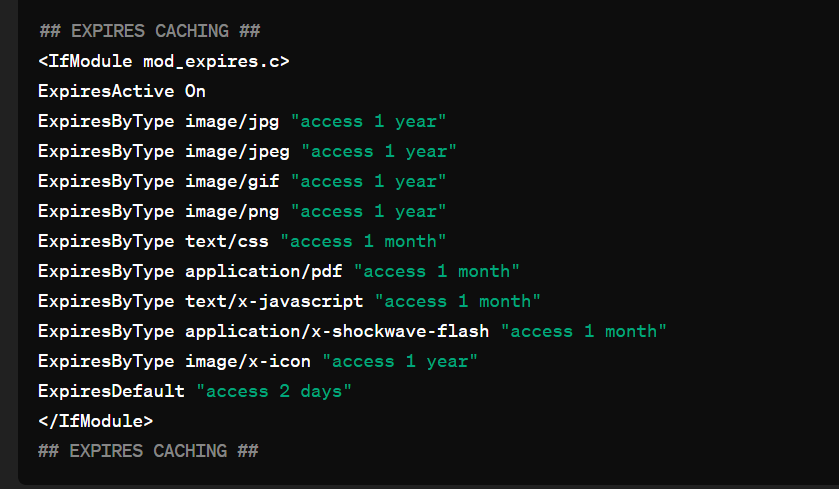
3. Save Changes and Test:
After editing the .htaccess file, save changes and test your website to ensure that the Expires Headers are functioning correctly.
Conclusion:
Adding Expires Headers to your WordPress website is a crucial step towards optimizing its performance.
Whether you’re a beginner utilizing caching plugins or an expert editing server configurations, the goal remains the same: to enhance loading speed, conserve bandwidth, and provide users with an exceptional browsing experience.
By following the steps outlined in this guide on how to add expires headers in WordPress, you can effectively leverage Expires Headers to unlock the full potential of your WordPress site.
