The internet is a pretty dangerous place. Unlike the real world, the internet is still in it’s infancy , as such most people still have a very brief idea of what the world wide web is capable of. Your website , which might seem to you as secured as a fort on an island, is probably open to a ton of security holes you have no clue about.
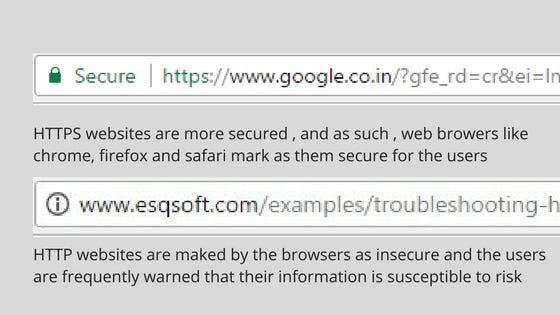
A SSL certificate fills up a lot of these holes, all alone. That’s what it does. The main advantage is has that is secures all the confidential information that your users are entering on your website. This becomes especially important in cases where you are receiving a user’s financial information like their credit card information or passwords. An easy way of identifying if a site is secured or not is looking at their URLs. A HTTPS one will be marked secure while a HTTP one will be marked suspicious.
Buying a SSL certificate should be one of the first things you should be doing after getting yourself a new domain. Just because your hosting provider claims it is secure does not means so unless you are being given a SSL certificate alongwith (or are buying it seperately).
The advantages of having a SSL — secured website are many. But if you are’nt handling the migration to HTTPs, you might be at a bit of a disadvantage. The following is a list of things you should be doing after you have gotten your website a sweet new SSL certificate.
1. Building a new URL Map and Redirecting all the Old Pages:
A website URL structure plays an essential role in improving user experience and search engine rankings. However, if you have a website with outdated URLs, it can negatively affect your SEO and user experience. Therefore, it’s important to build a new URL map and redirect all old pages to the new URLs. In this article, we’ll discuss how to do it and the steps to get an SSL certificate to secure your website.
Create a New URL Map:
The first step in building a new URL map is to analyze your existing URLs and create a new structure that makes sense for your users and search engines. You should keep your URLs simple, concise, and relevant to your content. A good URL structure can improve your website’s rankings and help users navigate your website easily.
Redirect all Old Pages to New URLs:
Once you’ve created your new URL structure, you need to redirect all your old pages to the new URLs. This is important to ensure that users and search engines can access your new content without any issues. There are two types of redirects you can use:
301 Redirects: This is a permanent redirect that tells search engines that the old page has been permanently moved to a new URL. It’s the best option to use when you’re permanently changing your URL structure.
302 Redirects: This is a temporary redirect that tells search engines that the old page has temporarily moved to a new URL. This option is suitable if you’re making temporary changes to your website or if you’re planning to revert to your old URL structure.
To set up redirects, you can use a plugin if you’re using a CMS like WordPress. Otherwise, you can add redirect rules to your .htaccess file. Ensure that you test your redirects to make sure they’re working correctly.
2. Updating all your Internal Links
If you’re planning to get an SSL certificate for your website, you’ll need to update all your internal links to use HTTPS instead of HTTP. Internal links are links that point to other pages on your website, and they can affect your website’s rankings and user experience.
Why it’s Important to Update Your Internal links:
When you update your internal links to use HTTPS, you ensure that all data transmitted between your website and your users’ browsers is encrypted and secure. This is important for protecting your users’ data and improving your website’s trustworthiness. Additionally, search engines consider HTTPS as a ranking factor, so updating your internal links can improve your website’s rankings.
Update your internal links:
To update your internal links, you’ll need to go through your website and update all the links to use HTTPS instead of HTTP. This can be a time-consuming process, especially if you have a large website. However, there are several tools you can use to automate the process and make it easier.
If you’re using a CMS like WordPress, you can use a plugin like Velvet Blues Update URLs or Better Search Replace to update your internal links. These plugins search through your website’s database and update all instances of HTTP to HTTPS. However, make sure you back up your website before using these plugins to avoid any potential issues.
If you’re not using a CMS or prefer to update your internal links manually, you can use a find and replace tool like Notepad++ to update all instances of HTTP to HTTPS. You’ll need to download all your website files, open them in Notepad++, and use the find and replace function to update your internal links. However, be careful not to overwrite any important files, and make sure you test your website after updating your internal links to ensure everything is working correctly.
3. Updating Links to Files and Images

If you’re planning to get an SSL certificate for your website, you’ll need to update the links to files and images to use HTTPS instead of HTTP. Links to files and images are often used in blog posts, articles, and other content, and they can affect your website’s rankings and user experience.
Why it’s Important to Update your Links to Files and Images:
When you update your links to files and images to use HTTPS, you ensure that all data transmitted between your website and your users’ browsers is encrypted and secure. This is important for protecting your users’ data and improving your website’s trustworthiness. Additionally, search engines consider HTTPS as a ranking factor, so updating your links to files and images can improve your website’s rankings.
Update your Links to Files and Images:
o update your links to files and images, you’ll need to go through your website and update all the links to use HTTPS instead of HTTP. This can be a time-consuming process, especially if you have a large website. However, there are several tools you can use to automate the process and make it easier.
Conclusion:
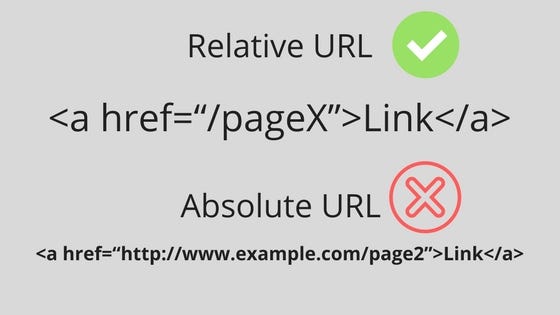
You need to edit all the calls made to these files from the HTTP to the HTTPS server. Again, all you need to do is to add the “S”. In case you are planning to use both HTTP and HTTPS protocols, we recommend switching to a relative URL structure for both web pages and server-side files.
A secured website is a good website. So buying that SSL certificate was a great thing you did. Once you are complete with these three things too, you can be confident that your website is optimized for delivering over secured servers as well. The gaps would have been filled and your visitors would enjoy a safe and secure experience.


1 Comment
-