


In the realm of website development and management, the concept of a staging site holds paramount importance. It serves as a sandbox environment where developers and designers can experiment with changes, test new features, and troubleshoot issues without affecting the live site.
For WordPress users, setting up a staging site might sound like a daunting task, but with the right approach, it can be accomplished swiftly and efficiently.
In this guide on easy ways to quickly set up a WordPress staging site, we’ll explore the significance of setting up a WordPress staging site, along with step-by-step instructions tailored for both beginners and expert users.
Significance of Setting Up a WordPress Staging Site:
Before delving into the nitty-gritty of setting up a staging site, it’s crucial to understand why it’s such a valuable asset in the web development process.
1. Risk Mitigation:
Making changes directly on a live WordPress site can be risky. Any error or compatibility issue can result in downtime or functional disruptions for visitors.
A staging site provides a safe environment to test changes before deploying them live, minimizing the risk of potential issues.
2. Enhanced Collaboration:
Staging sites facilitate collaboration among team members by providing a centralized platform for testing and reviewing changes. Designers, developers, and content creators can work together seamlessly to refine website elements without interfering with the live site.
3 . Optimized Performance:
Performance optimization is critical for any website. With a staging site, you can conduct performance tests, implement optimization techniques, and gauge the impact of changes on site speed and responsiveness before implementing them on the live site.
4. Streamlined Updates and Upgrades:
Staging sites are ideal for testing WordPress core updates, theme modifications, and plugin installations.
By assessing compatibility and functionality in a staging environment, you can ensure smooth updates and upgrades on the live site, minimizing downtime and potential conflicts.
5. Effective Troubleshooting:
Staging sites serve as invaluable troubleshooting tools. If issues arise on the live site, you can replicate the problem on the staging site to diagnose and resolve it without disrupting the user experience.
Step-by-Step Guide:
For Beginners:
Setting up a WordPress staging site might seem daunting for beginners, but with user-friendly tools and step-by-step instructions, it becomes a manageable task.
Step 1: Choose a Hosting Provider:
Select a hosting provider that offers staging site functionality as part of its services. Many popular hosting providers, such as SiteGround, Bluehost, and WP Engine, offer one-click staging site setups.
Step 2: Install WordPress:
Once you’ve signed up with a hosting provider, install WordPress on your hosting account. Most hosting providers offer automated WordPress installations through their control panels, making it a simple process for beginners.
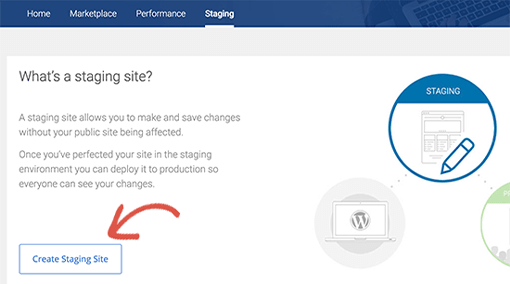
Step 3: Enable Staging Site:
Depending on your hosting provider, enabling the staging site feature may vary. In most cases, you can find this option within your hosting account’s dashboard or control panel.
Follow the provided instructions to create a staging site from your live WordPress installation.
Step 4: Work on Staging Site:
Once your staging site is set up, you can start working on it just like you would on your live site. Install themes, plugins, and make necessary changes without worrying about affecting the live site.
Step 5: Test and Review Changes:
After implementing changes on your staging site, thoroughly test them to ensure everything functions as intended. Check for compatibility issues, responsiveness, and overall user experience.
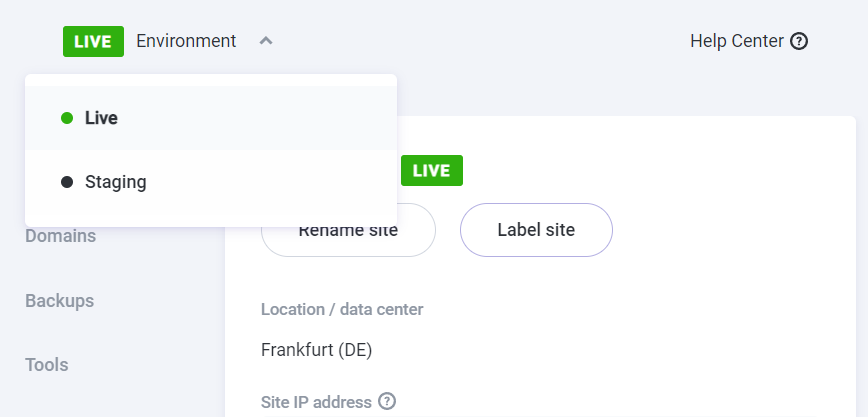
Step 6: Deploy Changes to Live Site:
Once you’re satisfied with the changes on your staging site, it’s time to deploy them to the live site. Depending on your hosting provider, you may have options to easily push changes from staging to live with a simple click.
Pros:
- User-friendly setup process for beginners.
- Provides a safe environment for testing and experimentation.
- Minimizes the risk of errors on the live site.
- Facilitates collaboration among team members.
- Streamlines updates and upgrades.
Cons:
- Limited customization options compared to manual setups.
- Dependency on hosting provider’s staging site functionality.
- May incur additional costs depending on hosting plan.
For Expert Users:
Expert users may prefer more advanced methods for setting up a WordPress staging site, offering greater control and customization options.
Step 1: Choose Staging Environment:
Instead of relying solely on hosting provider’s staging site feature, expert users may opt for alternative staging environments such as local development servers or dedicated staging servers.
Step 2: Set Up Local Development Environment:
Utilize tools like XAMPP, MAMP, or Docker to create a local development environment on your computer. Install WordPress locally and configure it according to your preferences.
Step 3: Clone Live Site to Staging Environment:
For users preferring dedicated staging servers, clone the live site to the staging environment using tools like Duplicator, WP Staging, or manual migration methods.
Step 4: Implement Changes and Testing:
Make necessary changes and updates on the staging site, utilizing version control systems like Git for tracking modifications and collaborating with team members.
Step 5: Performance Optimization:
Expert users can delve into advanced performance optimization techniques such as code minification, image optimization, caching, and CDN integration to enhance site performance on the staging environment.
Step 6: Deployment to Live Site:
After thorough testing and optimization, deploy changes from the staging environment to the live site using deployment tools or manual migration methods.
Pros:
- Greater control over staging environment setup.
- Flexibility to choose preferred development tools and methods.
- Advanced customization options for performance optimization and testing.
- Independence from hosting provider limitations.
Cons:
- Requires technical expertise in server management and development tools.
- Initial setup may be more time-consuming compared to beginner-friendly methods.
- Potential for configuration errors and troubleshooting complexities.
Conclusion:
Setting up a WordPress staging site is an essential practice for website developers and administrators seeking to maintain the integrity and functionality of their sites.
Whether you’re a beginner or an expert user, there are various approaches to quickly establish a staging environment tailored to your needs.
By following the outlined steps and considering the pros and cons of easy ways to quickly set up a WordPress staging site, you can streamline your development workflow, minimize risks, and ensure a seamless user experience for your WordPress site.


Leave a Reply