
DDoS attacks are not new in the cyberspace world. The past five years have seen a surge in these attacks and the DDoS landscape keep evolving as time goes by.
So, what is a DDoS Attack?
A DDoS (Distributed Denial of Service) attack is a nefarious cyber-attack that intentionally seeks to disrupt the normal flow of traffic to a server or blocks access of normal service by users by flooding or overwhelming the intended target with a flood of packets. DDoS attacks leverage the use of botnets to carry out these malicious attacks. A botnet, portmanteau of robot and network, is a network of compromised Computer systems infected with malware designed to bring down systems. Botnets are designed by hackers to flood the target computer systems & servers with IP packets causing disruption of access to networks, applications and by normal users. DDoS are very notorious and are known to cause devastating effects especially to large corporations. A DDoS attack can take down an e-commerce website for several hours causing huge losses to the business. It can also lead to a loss of internet connectivity and access to critical server resources.
History of DDoS Attacks
The first ever DDoS attack was engineered by a 15-year-old boy called Michal Calce in the year 2000 and was done purely for bragging rights. It temporarily took down huge sites like CNN, Yahoo, and eBay.
One of the most notorious and debilitating cases of DDoS attack was the DDoS attack on Dyn, a DNS provider, that led to inaccessibility of major internet sites across most parts of Europe and North America. The DDoS attack began on 21st October 2016 at 11:00 UTC and lasted till 13:20 UTC. It later resumed at 15:50 UTC and went up till 17:00 UTC. The primary source of the attack was pointed to a botnet of internet connected devices which were infected with the Mirai malware. A huge number of IP addresses flooded Dyn’s network with massive TCP and UDP packets that targeted port 53 which is the native DNS port. So severe and sophisticated was the attack that it took down top websites such as CNN, PayPal, Heroku, Spotify, Airbnb, Reddit, GitHub, HBO, SoundCloud to mention just a few.The attack affected users across Europe and America but was eventually contained and normal services were restored.
However, we cannot emphasize more the extent of damage it had on end users and the Companies alike. GitHub, a popular development platform suffered a catastrophic DDoS attack that was occasioned by a record-breaking 1.35 Tbps of traffic on their systems. Yeah, you heard it right. Unlike in Dyn, this attack was contained within 8 minutes and normal service was restored.
Who’s at risk of a DDoS attack?
An average PC user need not worry about a DDoS attack. However, businesses of all sizes from small to enterprises stand to lose revenue and suffer a possible plummeting of their Shares in the market due to the downtime of their services. To mitigate this risk, they must, therefore, invest heavily on security measures to counteract such attacks
How do you know that you have Fallen Victim of a DDoS Attack?
DDoS attacks hit their target without much of a warning. You cannot prevent a cyber attacker from sending malicious packets to flood your system and render its services unavailable. However, there are tell-tale signs of a system that has been compromised by a DDoS attack. Let’s have a look at how you can diagnose a DDoS attack.
“DDoS attacks cannot be prevented, but only mitigated.”
Service Unavailable Error
When a server goes down, one of the first clues is the “Server Unavailable” error when you try to browse it in a web browser and this may be persistent for a long time duration. In other cases, the server may be reachable, but its services may be degraded leading to slow connections. This anomaly can be diagnosed further using the netstat command in both Windows, Linux/ Unix Systems.
Netstat is a network command tool the displays active TCP and UDP ports on which a server is listening on, IP routing table, Ethernet statistics and both IPv4 and IPv6 statistics. Without any arguments, the command displays all active TCP ports on which the server is listening.
To check for unusual IPs connecting to your system run
$ netstat -an
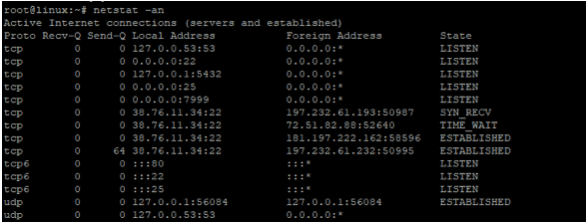
The above output is of a normal/expected output showing TCP and UDP active connections. If a DDoS attack has occurred, you would notice a huge number of IP addresses connected to the same port
tcp        0    197. 76. 11 34:22         38.248.152.106:41286    TIME_WAIT
tcp        0    197. 76. 11 34:22         38.248.152.106:41287    TIME_WAIT
tcp        0    197. 76. 11 34:22         38.248.152.106:41288    TIME_WAIT
tcp        0    197. 76. 11 34:22         38.248.152.106:41289    TIME_WAIT
tcp        0    197. 76. 11 34:22         38.248.152.106:41290    TIME_WAIT
tcp        0    197. 76. 11 34:22         38.248.152.106:41291    TIME_WAIT
tcp        0    197. 76. 11 34:22         38.248.152.106:41292    TIME_WAIT
tcp        0    197. 76. 11 34:22         38.248.152.106:41293    TIME_WAIT
tcp        0    197. 76. 11 34:22         38.248.152.106:41294    TIME_WAIT
From the above output, we can see one IP that is flooding the system on port 22 with meaningless IP packets and the connection is continually timing out.
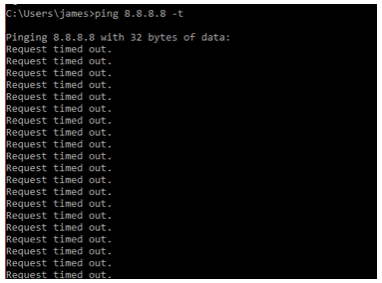
Zero Network Traffic
Another way you can spot a potential DDoS attack on your PC is a loss of network traffic or packet loss to your website or server.
If you try pinging any website or its address, you will also discover that it is either timing out entirely or resulting in loss of packets.
Checking Nginx/Apache/webserver logs
Another way you can verify that a DDoS attack has occurred is by examining web server log files. But before we examine the log files, we can check the clients connected to our server by running the command below
netstat -ntu | awk '{print $5}' | cut -d: -f1 | sort | uniq -c | sort -n

If you see an unusually high number of connections. more than you have been experiencing, then it’s likely that you could be a victim of a DDoS attack.
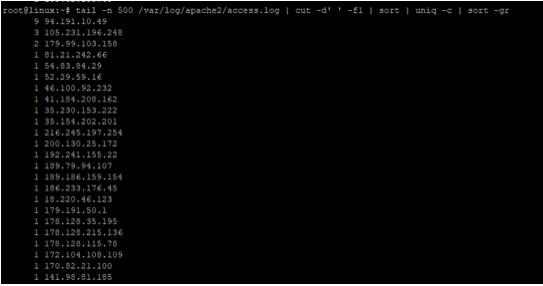
For Apache, you can access the apache access logs to view the client IPs sending requests to your web server using the command below
tail -n 500 /var/log/apache2/access.log | cut -d' ' -f1 | sort | uniq -c | sort -gr
Use the same command to access Nginx access log files as shown
tail -n 500 /var/log/nginx/access.log | cut -d' ' -f1 | sort | uniq -c | sort -gr

Once again, if you are getting a high number of IP address sending requests to your web server, then definitely you could be a potential victim of a DDoS attack.
Protecting Yourself from a DDoS Attack
Having looked at some of the ways you can use to point out a DDoS attack, let’s now look at ways in which you can prevent your system from falling victim of such unprecedented attacks.
Tweaking Nginx Parameters
If you have a server running on Nginx, a few modifications will come in handy in mitigating DDoS attacks. Let’s have a look
Modifying Worker_Process Connections
One of the parameters you might want to consider modifying is the worker process as well as the no. of worker connections in the /etc/nginx/nginx.conf configuration file. In anticipation of DDoS attacks, the value of worker_ connections should be set to a higher value to handle DDoS attacks. For instance, the value can be set to 10000 as shown below
events {

        worker_connections 100000;

}
Additionally, consider modifying the fs.file-max attribute in the /etc/sysctl.conf file and limit the number of connections as shown
fs.file-max = 50000
Limiting the Rate of Requests
This is arguably one of the best avenues of preventing DDoS attacks in the Nginx web server. It works by limiting the number of requests from a specific IP address in a given time duration. If the limit is surpassed, then Nginx drops these requests. The limit_req_zone directive is tweaked to limit the number of requests as seen below
limit_req_zone $binary_remote_addr zone=one:10m rate=30r/m;

server {

    # ...

    location /login.html {

        limit_req zone=one;

    # ...

    }
}
The above command will create a memory space called one which can accommodate 160,000 unique IP addresses. The rate=30r/m directive implies that only 30 requests in a minute are permitted.
Limiting Connections Rate
To further enhance the performance of Nginx, you can limit the rate of connections emanating from a single IP address. The directives limit_conn and limit_conn_zone is tweaked to put a limit to the number of IP address connections.
limit_conn_zone $binary_remote_addr zone=one:20m;

server {

location /admin/ {

limit_conn addr 20;

}}
Adjusting Timeout Parameters
Slow connections have a severe impact on the Nginx server. These connections keep connections open long enough such that the server cannot accept any more inbound connections. The attributed client_body_timeout, as well as client_header_timeout, are tweaked to lower values
server {

client_body_timeout 10s;

client_header_timeout 10s;

}
Limiting the size of HTTP requests
Huge HTTP requests are often a precursor to a DDoS attack. To mitigate this issue,
Buffer values existing in the Nginx Configuration are limited as follows
client_body_buffer_size 200K;

client_header_buffer_size 2k;

client_max_body_size 200k;

large_client_header_buffers 3 1k;
Limiting connections to backend servers
When used as a load balancer, you can limit the number of connections made to the backend servers. For example, you can tweak the settings such that no more than 150 connections are made to the 2 backend servers shown below
upstream domain {

server 10.200.50.2:80 max_conns=150;

server 10.200.50.3:80 max_conns=150;

queue 20 timeout=5s;

}
The max_conns attribute specifies the no. of connections that can be opened up by Nginx to the server. The queue attribute limits the no. of queued requests when all backend servers have reached the connection threshold. The timeout parameter specifies the duration thay a request can be maintained in the queue.
Blacklisting IP addresses
This is yet another effective method of warding off DDoS attacks. If you suspect that a range of IP addresses are responsible for the attack e.g from 197.232.64.20 to 197.232.64.154, you can block the IP range as shown
location / {

    deny 197.232.64.0/24;

    # ...

}
Using the CSF Firewall in cPanel
A few tweaks can be made to the CSF firewall to block IP address that have numerous connections
On the terminal, Open the CSF configuration file using your most preferred text editor
$ vim /etc/csf/csf.conf
Restricting the number of concurrent connections
Restriction of the number of concurrent connections coming from a single unique IP would be very effective in mitigating DDOS attacks. It’s therefore prudent to reduce the value of CT_Limit to a reasonable level. In this case, the value has been set to 50
CT_LIMIT=50
This implies that the maximum possible number of connections per given IP address is 50. Since the value is not arbitrary, feel free to change the value according to your settings.
Changing the Connection Tracking Interval CT_INTERVAL
This refers to the Connection Tracking value. This should also be set to a fairly reasonable value because if set too low, false positives may be generated and can lead to the blocking of legitimate connections. A value set to 30 is recommended.
CT_INTERVEAL=30
Allow protection for a specific port using the CT_PORTS directive
To allow protection for a specific port, you can define that in the configuration parameter called the ‘CT_PORTS’. For instance, in most cases, DDOS attacks will be directed web and DNS servers. In such cases, the ports to be defined for default installation are 53 and 80
In the below example I am tweaking the protection for web server both for normal and SSL connections
In the example below, the protection for web server ports (80 & 443) has been tweaked both for normal HTTP and SSL connections.
CT_PORTS=80,443
Enabling SYNFLOOD
SYNFLOOD is disabled by default in CSF. To prevent the server from suffering a SYNFLOOD attack, enable it temporarily as shown below
SYNFLOOD = “1"

SYNFLOOD_RATE = “30/s”

SYNFLOOD_BURST = “30"
What the above settings suggest is that If 30 connections are received from an IP/sec for 30 times, then the concerned IP is going to be blocked. Again, this value is just arbitrary. You can adjust the SYNFLOOD_BURST value according to your server capacity.
You can set a limit for the number of connections to a specific port by checking the “CONLIMIT”. value
CONNLIMIT = 80;20,443;15
In the above example, 20 connections are limited to port 80 and 15 connections limited to port 443 from a single IP address.
Now that we are done with all the modification, we need to restart the CSF firewall service to make the changes effective with the new settings. To achieve this, run the command below
/etc/init.d/csf restart
Configuring Apache Mod_Deflate to Enhance Server Performance
If you are looking at boosting or enhancing your server’s performance, consider enabling mod_deflate in Apache configuration. The module compresses content from the web server before serving it to the browser for clients to access it. Compression makes it possible for all browsers to download it in a much faster way.
Apart from serving your pages much faster, the lower bandwidth associated with compression will be taken into account by search engines. This will consequently lead to higher page rank in Google and other search engines
By default, mod_deflate comes included with Apache. To verify this run the command
$ apachectl -t -D DUMP_MODULES | grep deflate
You should get the output below
deflate_module shared

If you do not get such output, open the following configuration file
/etc/apache2/mods-enabled/deflate.load
<p”>Ensure that the following line in uncommented as shown
LoadModule deflate_module /usr/lib/apache2/modules/mod_deflate.so

To make the changes effective, restart Apache web server
sudo apachectl restart
To achieve the full benefits of mod_deflate, we need to instruct the Apache web server which files need to be compressed. It is recommended that HTML, CSS and Javascript files should be compressed. Although the default configuration is already defined for these, it not configured for the options below
Compression Level –This defines the level of file compression which is between 1 to 9 with 1 being the lowest compression level
Mem Level – This defines the amount of memory required by zlib for compression
Window Size –Specifies the window size for zlib compression
Out of the box, the default compression level is set to 9, Mem level set to 9, and Window size set to 15.
These are already set to their highest value, implying that your server is still not yet at its optimal setting and quite a lot of resources will be gobbled up. we, therefore, need to reduce the values to these parameters.
DeflateCompressionLevel 7
<DeflateMemLevel 8
DeflateWindowSize 10
Save and restart Apache web server.
Testing the compression
To make sure that our mod_deflate module is working as expected, we are going to log in to a server and open the terminal.
Next, navigate to the document root
$ cd /var/www/html directory.
Next, download a sample js file http://code.jquery.com/jquery-3.2.1.js to the directory
$ wget http://code.jquery.com/jquery-3.2.1.js
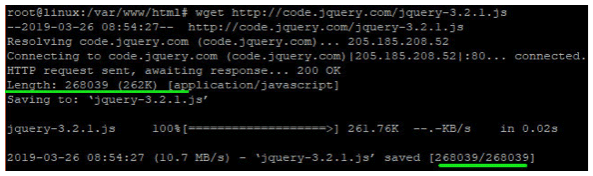
As seen above, the file size is 268039 bytes
Now head out to another Linux PC in your network and run the command below
wget --header="Accept-Encoding: gzip" http://SERVER_IP/jquery-3.2.1.js
The SERVER_IP is the IP of the server above where we downloaded the JS file

As you can see, the JS file size has been listed as 104285 bytes, which is less than half the original file size! Compression is working as expected and your server is working at an optimal compression level without compromising or affecting the performance of the Apache web server.
Use a DDoS Protection Service
If your website is being attacked, you can sign up to use dedicated DDoS protection services such as CloudFlare, Incapsula & Stormwall.pro.
These services stand as a proxy or shield in front of your website and filter all traffic that reaches your site. The setup is usually very straight forward and involves you changing your nameserver to the nameservers provided to you when you sign up with either of the services mentioned above and letting all traffic pass through their network. The service will filter out all bad traffic and only send legitimate traffic to your website.
However, this may not be a feasible solution if you are looking to protect your entire server that hosts multiple websites and clients. Which is when you need a DDoS protected hosting provider.
Use a DDoS Protected Hosting Provider
Of course, the easiest way to protect yourself against any kind of DDoS attack is to host your website with a hosting provider that includes DDoS Protection. Such provider will usually have their entire network protected against DDoS attacks and as a website or server owner you need to make any changes or adjustments to protect your website against attacks.
We hope this post has been helpful and you have learned something from it. Have you ever been a victim of DDoS attacks? Let us know in the comments section below.
If you are looking for a hosting provider that offers DDoS protection as standard with all of it’s hosting plans, look no further than Host4Geeks.