Accessing the WordPress admin panel (wp-admin) after hosting expiration can be challenging because the website and its associated services are no longer active. Here’s a detailed explanation of the phenomenon, including the importance of hosting and the considerations for accessing wp-admin after hosting expiration:
Understanding Hosting and Its Importance
Web Hosting Definition
Web hosting is a service that allows organizations and individuals to post a website or web page onto the Internet. A web host, or hosting service provider, is a business that provides the technologies and services needed for the website or webpage to be viewed on the Internet. There are several types of web hosting services available such as Shared Hosting, Virtual Private Server (VPS) Hosting, Semi Dedicated Server Hosting, and many more. These options cater to different needs and budgets, allowing you to select a plan that best fits your requirements.
Importance of Web Hosting
- Accessibility: Without hosting, your website cannot be accessed by visitors.
- Storage: Hosting provides the necessary space to store website files, databases, and content.
- Performance: Good hosting ensures your site loads quickly and runs efficiently.
- Security: Hosting services often include security features to protect your website from threats.
Hosting Expiration
- Hosting services are typically purchased on a subscription basis (monthly or annually). When this subscription expires, the hosting provider may suspend your website, making it inaccessible online.
Steps to Access wp-admin After Hosting Expiration
Renew Hosting Plan:
- Log in to your hosting provider’s dashboard and check if you can renew your plan. Pay any overdue fees to reactivate your account.
Recover Backup:
- If renewal is not possible or desired, recover your site using a recent backup. Download and save all necessary files and the database.
Set Up a Local Development Environment:
- Download Software: Install XAMPP, WAMP, or MAMP on your computer.
- Transfer Files: Move your website files to the appropriate directory (e.g., htdocs for XAMPP).
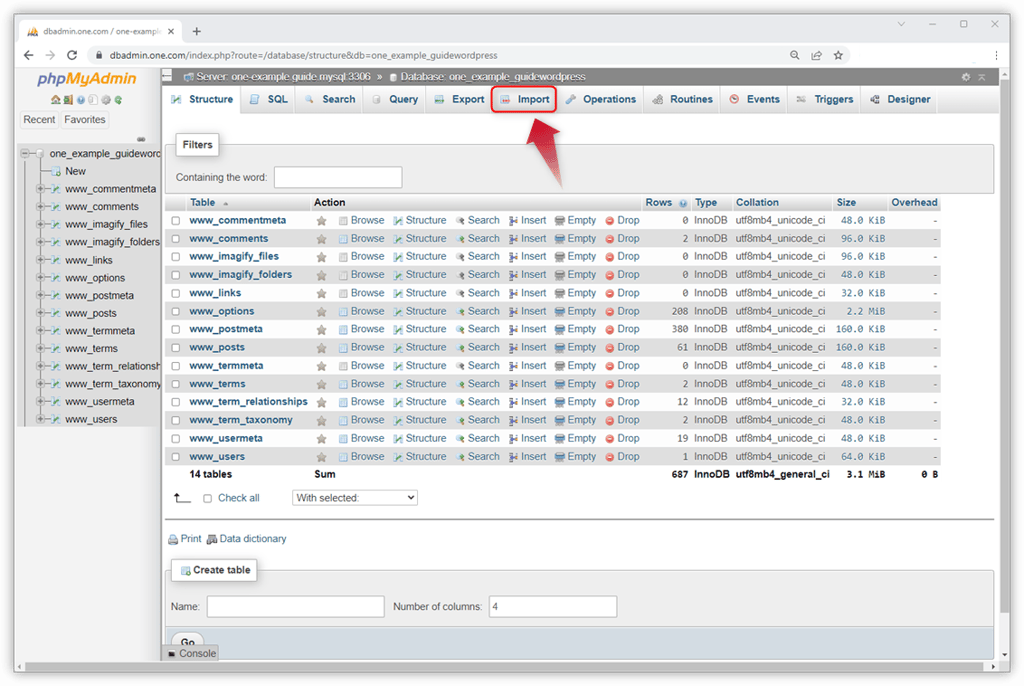
- Import Database: Use phpMyAdmin or a similar tool to import your database into the local MySQL server.
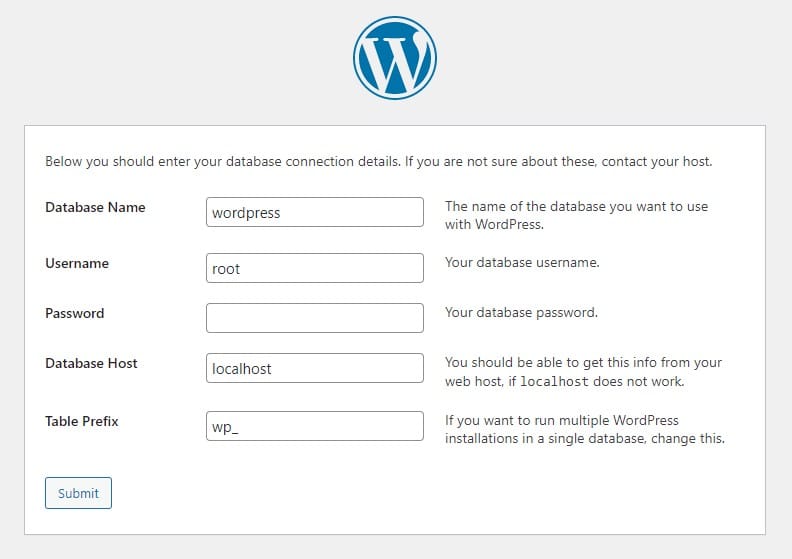
- Configure wp-config.php: Update the wp-config.php file with your local database credentials.
Migrate to New Hosting:
- Choose a new hosting provider and sign up for a plan.
- Upload Files: Use FTP or the hosting provider’s file manager to upload your website files to the new server.
- Import Database: Import your database to the new host’s MySQL server.
- Update DNS: Change your domain’s DNS settings to point to the new hosting provider.
Access wp-admin:
- Local Access: Open a web browser and navigate to localhost/your-site-folder/wp-admin to access wp-admin on your local setup.
- New Hosting Access: Once DNS propagation is complete, navigate to your website’s wp-admin URL (e.g., yourdomain.com/wp-admin).
Considerations While Accessing wp-admin After Hosting Expiration
Check Hosting Provider’s Grace Period Policy:
- Grace Period: Many hosting providers offer a grace period after your hosting plan expires. This period allows you to renew your plan without losing any data or access. Check with your provider to understand how long this grace period lasts and use it to your advantage.
- Renewal Options: During the grace period, you can usually renew your hosting plan by paying the overdue fees. This is the simplest and fastest way to regain access.
Understand Data Retention Policies:
- Retention Period: Some hosting providers retain your data for a limited time after the hosting plan expires. Beyond this period, your data might be deleted permanently.
- Backup Availability: Confirm if your hosting provider has made recent backups of your site and how you can access them.
Assess Alternative Hosting Options:
- New Hosting Provider: If you’re unable to renew your current hosting plan or wish to switch providers, research alternative hosting services. Choose a provider that meets your website’s needs in terms of performance, security, and cost.
- Migration Support: Some hosting providers offer free migration services. This can simplify the process of transferring your website files and databases to a new host.
Prepare for Data Recovery:
- Local Backups: Ideally, you should have regular local backups of your website files and database. If you don’t have a recent backup, you might need to contact your hosting provider to see if they can provide one.
- Manual Backup Retrieval: If you have access to your website’s files via FTP or a similar method, manually download all necessary files and export your database.
Use a Local Development Environment:
- Local Setup: Set up a local development environment using software like XAMPP, WAMP, or MAMP. This allows you to work on your website offline until your hosting is restored.
- Local Database Configuration: Ensure you correctly configure your local database settings to match those of your website to avoid any issues.
Update DNS Settings:
- DNS Propagation: If you switch to a new hosting provider, update your domain’s DNS settings to point to the new server. Note that DNS changes can take up to 48 hours to propagate fully.
- Temporary Access: During DNS propagation, you might be able to access your site via the new hosting provider’s temporary URL or IP address.
Security Considerations:
- Access Control: Ensure that only authorized personnel have access to sensitive information during the transition period.
- SSL Certificates: If your SSL certificate was tied to your old hosting provider, you might need to reconfigure or obtain a new SSL certificate for your new host.
Communication with Users:
- Inform Stakeholders: Notify your users or stakeholders about potential downtime and any actions they might need to take.
- Temporary Page: Consider setting up a temporary maintenance page to inform visitors that your site is undergoing maintenance and will be back shortly.
Accessing wp-admin After Hosting Expiration
Immediate Actions Post-Expiration:
- Renew Hosting: The simplest solution is to renew your hosting plan. Contact your hosting provider, pay the necessary fees, and restore your website.
- Grace Period: Many hosting providers offer a grace period (a short period after expiration) during which you can renew your hosting without losing your data.
Backup Recovery:
- If renewing hosting is not an immediate option, use a recent backup of your website. Most hosting services offer backup options, and you might have downloaded a backup previously.
Temporary Hosting Solutions:
- Local Development Environment: Set up a local server using tools like XAMPP, WAMP, or MAMP. This allows you to access wp-admin locally on your computer.
- Download Local Server Software: Install XAMPP, WAMP, or MAMP on your computer.
- Move Website Files: Transfer your website files and database to the local server.
- Access wp-admin: Open your browser and go to localhost/wp-admin to access your WordPress admin panel.
- Alternative Hosting Provider: If you decide to change hosting providers, transfer your domain and website files to a new hosting service.
- Local Development Environment: Set up a local server using tools like XAMPP, WAMP, or MAMP. This allows you to access wp-admin locally on your computer.
Conclusion
Accessing wp-admin after hosting expiration involves understanding your hosting provider’s policies, preparing for potential data recovery, and having a backup plan, such as a local development environment or an alternative hosting provider. By considering these factors and following the outlined steps, you can effectively regain access to your WordPress admin panel and ensure the continuity of your website.