Replying to an email in Outlook 2019 is straightforward. Here’s a step-by-step guide to help you:
- Open Outlook: Launch Microsoft Outlook 2019 on your computer.
![]()
- Navigate to Inbox: Go to your Inbox to find the email you want to reply to.
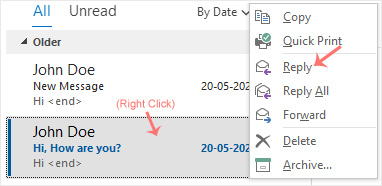
- Select the Email: Click on the email message that you want to reply to. This will open the email in the reading pane.
- Find Reply Options:
- Reply: If you simply want to reply to the sender, click on the “Reply” button located in the toolbar at the top of the email message. This will open a new email composition window with the original email quoted in your reply.
- Reply All: If you want to reply to the sender and all other recipients of the original email, click on the “Reply All” button. This is useful for group conversations where everyone needs to be kept in the loop.

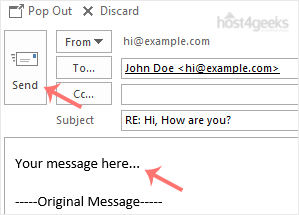
- Compose Your Reply: In the new email composition window, you’ll see the original email quoted above your reply. Type your response in the space provided below the quoted text.
- Formatting Your Reply: You can format your reply using the formatting tools available in the toolbar (e.g., font style, size, color, alignment, bullets, etc.).
- Attach Files (if needed): If you need to attach files with your reply, you can do so by clicking on the “Attach File” button in the toolbar and selecting the file(s) you want to attach from your computer.
- Send Your Reply: Once you have composed your reply and attached any necessary files, click on the “Send” button in the toolbar to send your email reply.

- Close the Reply Window: After sending your reply, you can close the reply window or go back to your Inbox by clicking on the appropriate buttons in the toolbar.
- Check Sent Items: To ensure that your reply was sent successfully, you can check your “Sent Items” folder in Outlook. This folder contains copies of all the emails you have sent.
Following these steps will help you effectively reply to emails using Outlook 2019, ensuring clear communication with your contacts.