Removing a domain alias in DirectAdmin involves a few steps. Here is a detailed, step-by-step guide to help you through the process:
Step 1: Log into DirectAdmin
- Open your web browser and navigate to your DirectAdmin login page.
- Enter your username and password.
- Click on the “Login” button.
Step 2: Navigate to Domain Aliases
- Once logged in, you will be directed to the DirectAdmin control panel.
- Look for the section titled “Advanced Features” or “Account Manager” depending on your version.
- Click on “Domain Pointers” or “Domain Aliases.”
![]()
Step 3: Select the Domain Alias to Remove
- In the Domain Pointers or Domain Aliases section, you will see a list of all the domain aliases currently set up for your account.
- Locate the domain alias you wish to remove from the list.
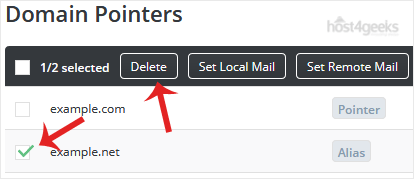
Step 4: Remove the Domain Alias
- Check the box next to the domain alias you want to remove.
- Look for a button or link that says “Delete” or “Remove” and click on it.
- You may be prompted to confirm the deletion. If so, confirm that you want to remove the alias.

Step 5: Confirm the Removal
- After confirming the deletion, DirectAdmin will process the request.
- You should see a message indicating that the domain alias has been successfully removed.
Step 6: Verify the Changes
- Navigate back to the Domain Pointers or Domain Aliases section to ensure the domain alias is no longer listed.
- If necessary, clear your browser cache or restart your web browser to see the changes.
Additional Tips
- Back Up Your Data: Before making any changes, it’s always a good idea to back up your data to avoid accidental loss.
- Check DNS Settings: After removing the domain alias, ensure that your DNS settings are updated accordingly to avoid any potential conflicts or downtime.
- Contact Support: If you encounter any issues or errors during this process, contact your hosting provider’s support team for assistance.
By following these steps, you should be able to remove a domain alias in DirectAdmin easily.