Changing the FTP user quota in cPanel is a crucial task for managing the disk space usage of different users on your hosting account. Here’s a detailed guide on how to change the FTP user quota for Host4Geeks users:
Step-by-Step Guide to Changing the FTP User Quota in cPanel
1. Log into cPanel
- Access cPanel
Open your web browser and enter the cPanel login URL provided by Host4Geeks. This is typically something like https://yourdomain.com/cpanel or https://yourdomain.com:2083.
- Login Credentials
Enter your cPanel username and password to log in.
2. Navigate to the FTP Accounts Section
- Files Section
Once you are logged into cPanel, scroll down to the “Files” section.
- FTP Accounts Icon
Click on the “FTP Accounts” icon. This will open the interface where you can manage your FTP accounts.

3. Locate the FTP Account
- List of FTP Accounts
In the “FTP Accounts” interface, you will see a list of all the FTP accounts associated with your cPanel account.
- Find the Account
Locate the FTP account for which you want to change the quota. The accounts are typically listed with their username and associated directory.
4. Change the Quota
- Quota Column
In the list of FTP accounts, find the “Quota” column next to the account you want to modify.
- Change Quota Link
Click on the “Change Quota” link or button next to the specific FTP account. This will open a new interface where you can set the new quota.
- Set New Quota
Enter the new quota value in the provided field. You can specify the quota in megabytes (MB). If you want to give the user unlimited disk space, select the “Unlimited” option.
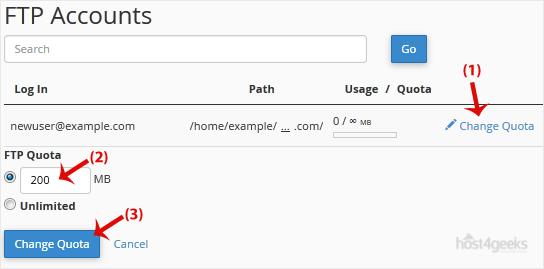
5. Save the Changes
- Save Button
After entering the new quota, click the “Save” or “Change Quota” button to apply the changes.
- Confirmation
A confirmation message will appear indicating that the quota has been successfully changed.
Additional Tips for Managing FTP User Quotas
- Monitor Disk Usage: Regularly monitor the disk usage of FTP accounts to ensure they do not exceed the allocated quota.
- Set Reasonable Quotas: Set reasonable quotas based on the expected usage to prevent any single user from consuming excessive disk space.
- Adjust as Needed: You can always come back and adjust the quotas as needed based on changes in user requirements or overall disk space availability.
Troubleshooting
- Quota Not Updating: If the quota does not seem to update properly, refresh the page and try again. Ensure you are entering a valid number.
- Permission Issues: Make sure you have the necessary permissions to change FTP quotas in your cPanel account. If you encounter permission errors, contact your hosting provider for assistance.
- Disk Space Limits: Be aware of your overall disk space limits for your hosting account. Setting high quotas for multiple users may lead to exceeding your account’s total disk space.
Contacting Support
For any issues or additional help, you can reach out to Host4Geeks customer support through:
- Support Portal: Access the support portal from your Host4Geeks account.
- Live Chat: Use the live chat feature on the Host4Geeks website.
- Email: Send an email to the Host4Geeks support team.
By following these detailed steps, you can effectively change the FTP user quota in cPanel on Host4Geeks, ensuring that your FTP accounts are managed efficiently and within your allocated disk space.