


In today’s digital landscape, website owners are constantly seeking ways to improve performance, security, and reliability. One powerful tool that has gained immense popularity in recent years is Cloudflare.
Known for its content delivery network (CDN), security features, and optimization tools, Cloudflare offer a comprehensive solution for enhancing the performance and security of WordPress websites.
In this guide, we’ll walk you through the step-by-step process of how to install Cloudflare on your WordPress site, ensuring that you leverage its full potential to elevate your online presence.
Understanding the Significance of Cloudflare for WordPress Sites
Before diving into the installation process, let’s explore why Cloudflare is essential for WordPress websites:
1. Performance Optimization:
Cloudflare’s CDN caches static content across its global network of servers, reducing latency and speeding up the delivery of web pages to visitors.
2. Enhanced Security:
With features like DDoS protection, Web Application Firewall (WAF), and SSL/TLS encryption, Cloudflare safeguards your WordPress site against various cyber threats and attacks.
3. Reliability:
By distributing website content across multiple servers worldwide, Cloudflare ensures high availability and uptime, minimizing the risk of downtime due to server issues or traffic spikes.
4. Analytics and Insights:
Cloudflare provides detailed analytics and insights into website traffic, performance metrics, and security threats, empowering site owners to make data-driven decisions for optimization.
Step-by-Step Guide to Installing Cloudflare on Your WordPress Site
Now, let’s walk through the process of installing Cloudflare on your WordPress site:
Step 1: Sign Up for a Cloudflare Account
1. Navigate to the Cloudflare website and sign up for an account. You’ll need to provide your email address and create a password.
2. After signing up, Cloudflare will prompt you to add your website. Enter your website’s domain name and click “Add Site.”
3. Cloudflare will scan your DNS records. Review the DNS records detected by Cloudflare and ensure they match your current setup. Once verified, click “Continue.”
Step 2: Select a Plan
1. Cloudflare offers different plans, including a free plan with essential features and paid plans with advanced capabilities. Choose a plan that best suits your needs and budget.
2. After selecting a plan, click “Continue” to proceed to the next step.
Step 3: Update Your DNS Settings
1. Cloudflare will provide you with nameservers that you need to update at your domain registrar. Log in to your domain registrar’s dashboard and replace the existing nameservers with the ones provided by Cloudflare.
2. It may take some time for the DNS changes to propagate globally. Once the changes have propagated, Cloudflare will notify you via email.
Step 4: Configure Cloudflare Settings
1. Once the DNS changes have propagated, log in to your Cloudflare account and navigate to the “DNS” tab.
2. Review your DNS settings and ensure that they are configured correctly. You can make changes to your DNS records if necessary.
Step 5: Install Cloudflare Plugin for WordPress
1. In your WordPress dashboard, go to the “Plugins” section and click “Add New.”
2. Search for the “Cloudflare” plugin and install it on your WordPress site.
3. Activate the plugin and navigate to the plugin settings page.
Step 6: Connect Cloudflare Plugin to Your Account
1. In the Cloudflare plugin settings, enter your Cloudflare email address and API key. You can find your API key in your Cloudflare account settings.
2. Once connected, the plugin will sync your WordPress site with your Cloudflare account.
Step 7: Configure Cloudflare Settings in WordPress
1. In the Cloudflare plugin settings, you can configure various options, including caching settings, security settings, and performance optimizations.
2. Customize the settings according to your preferences and website requirements.
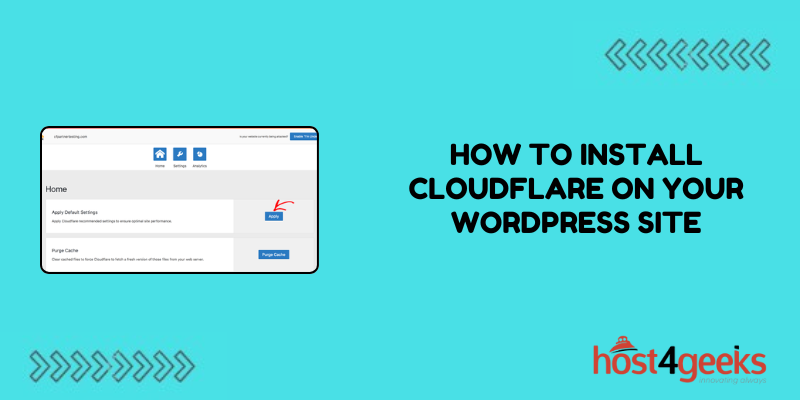
Step 8: Purge Cache and Test Your Site
1. After configuring the Cloudflare settings, purge the cache to ensure that your changes take effect immediately.
2. Test your website to verify that Cloudflare is properly configured and functioning as expected. Check the website performance, security features, and overall functionality.

Conclusion
Installing Cloudflare on your WordPress site is a strategic decision that can significantly improve performance, security, and reliability.
By following the step-by-step guide outlined above on how to Install Cloudflare on your WordPress Site, you can harness the full potential of Cloudflare and enhance your WordPress website’s user experience and online presence.
Take advantage of Cloudflare’s powerful features and optimize your website for success in the digital world.


Leave a Reply